Notice: We have now suspended this project.
If you want to do dropshipping with Nihaojewelry, we suggest you use Shopify or WooCommerce to build an e-commerce website. We have free plugins available(Nihao Dropshipping) for you to import products.
For details, please read these articles:
More and more people are starting to open shops online. If you have this plan but don’t know where to start, opening a shop online with Nihaojewelry is one of the best options available. Especially if you have already shopped from Nihaojewelry, you will find that opening a store online is not difficult for beginners.
In this article, we will help you to open an online shop in Nihaojewelry step by step.
- Apply for an online shop with Nihaojewelry
- Activate your online store
- Find your store URL
- Connect a custom domain
- Set up and manage your online store
- Publish your store
- Store analysis
- Order management
How to apply for an online shop with Nihaojewelry?
It is not complicated to apply for opening a shop from Nihaojewelry.
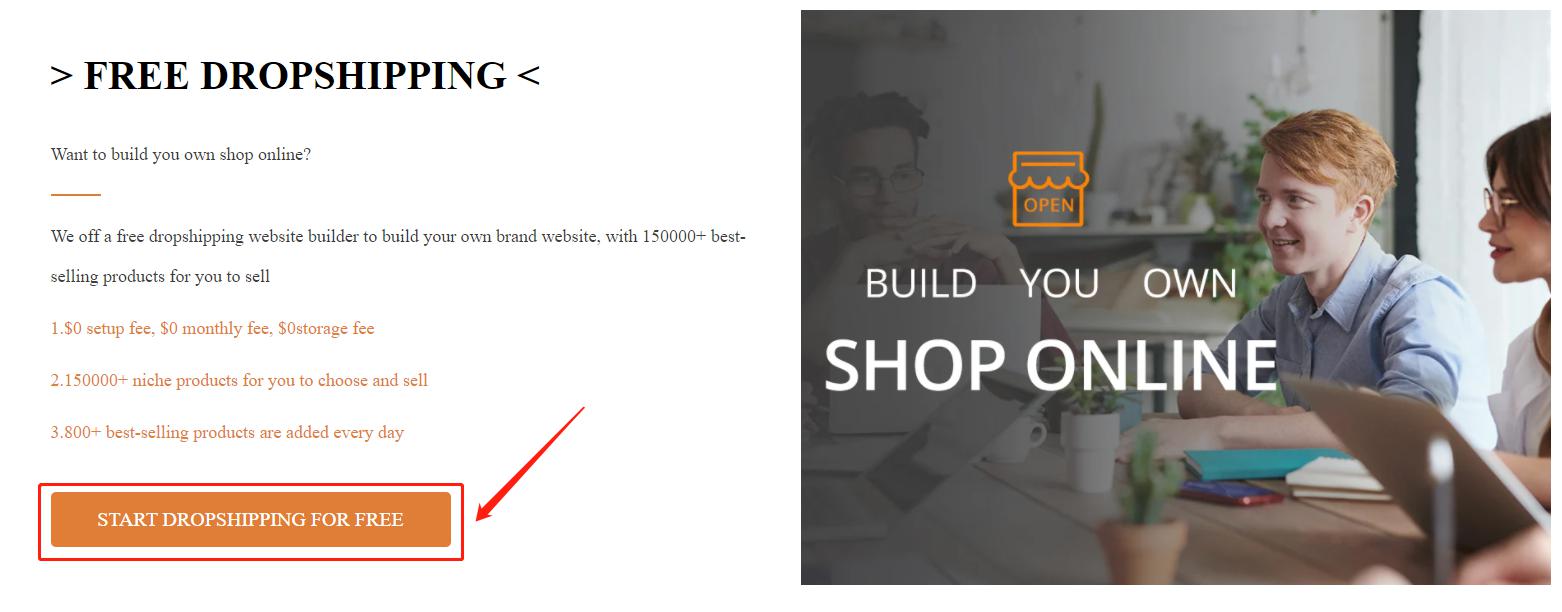
Go to the Nihaojewelry dropshipping page, you will find three buttons to apply for a shop. Click any of the buttons (“Start dropping for free” as shown in the figure below) to start applying for the store.
If you have not registered or logged in to your Nihaojewelry account, it will go to the account login page of Nihaojewelry. After you complete the registration or login, it will be redirected to the store application page.
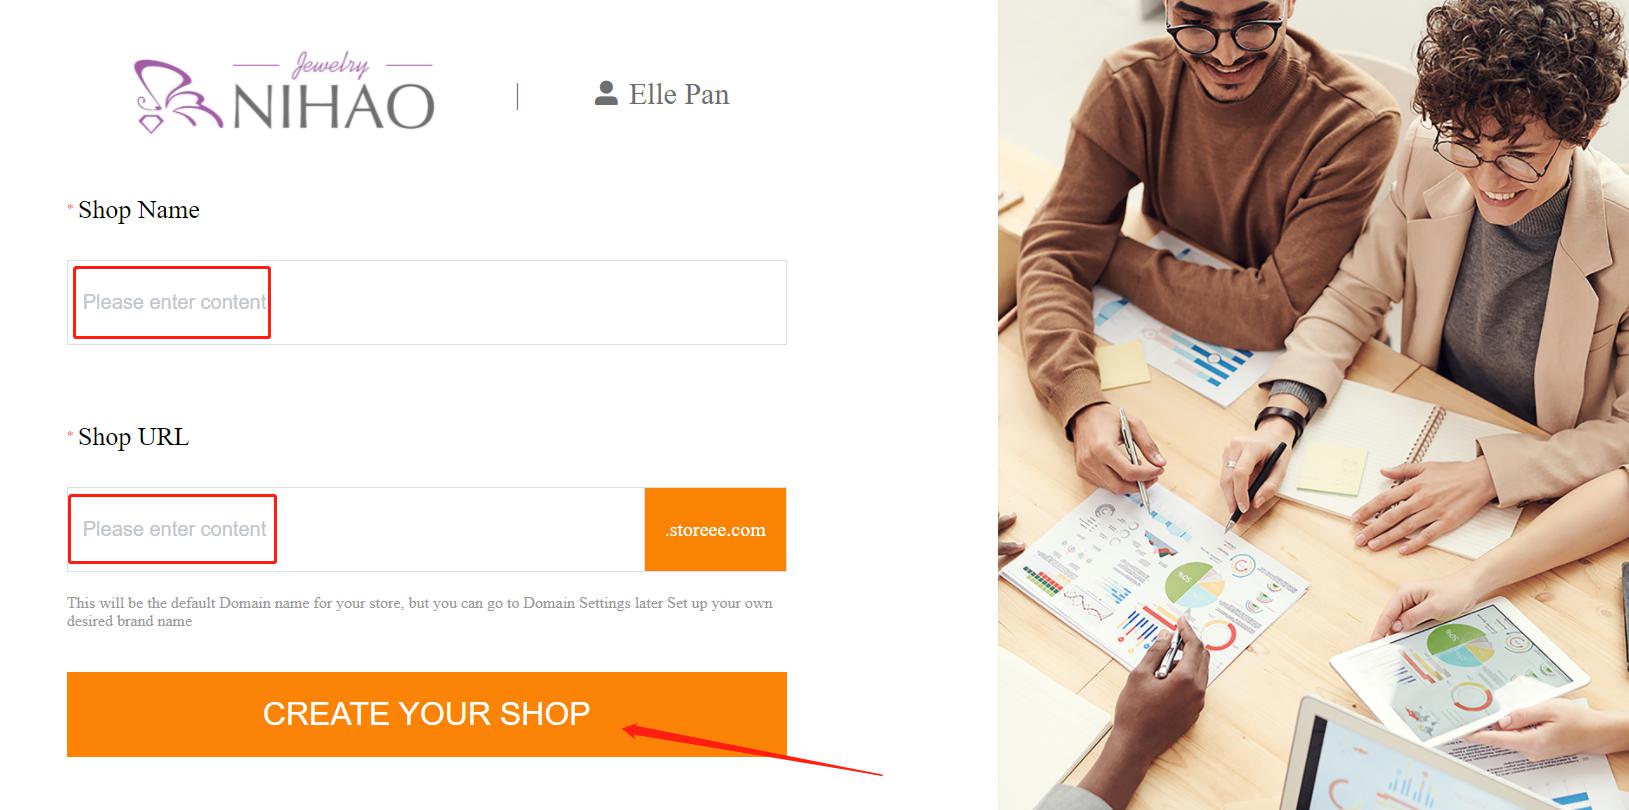
Enter your store name and URL. By default, your shop URL will contain “storeee.com”. You won’t be able to change this setting, but you can buy a custom domain (e.g. yourstore.com) later, so don’t worry about choosing the perfect name for now. Finally, click “create your shop” to complete.
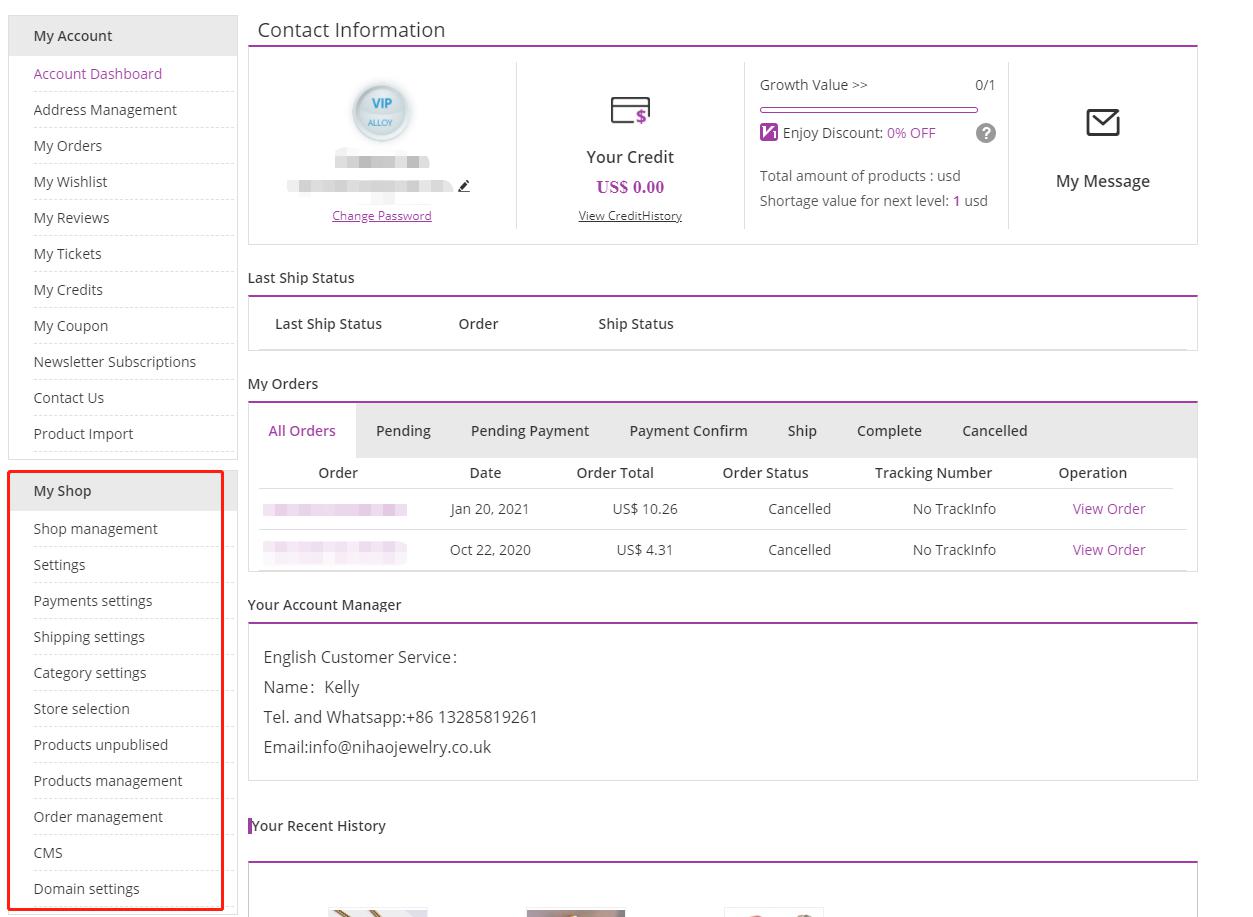
When finished, your “Account Dashboard” will add “My shop” navigation to set up and manage your shop.
Activate your online store
Your store is inactive after the application is completed. You need to activate it by setting up a store.
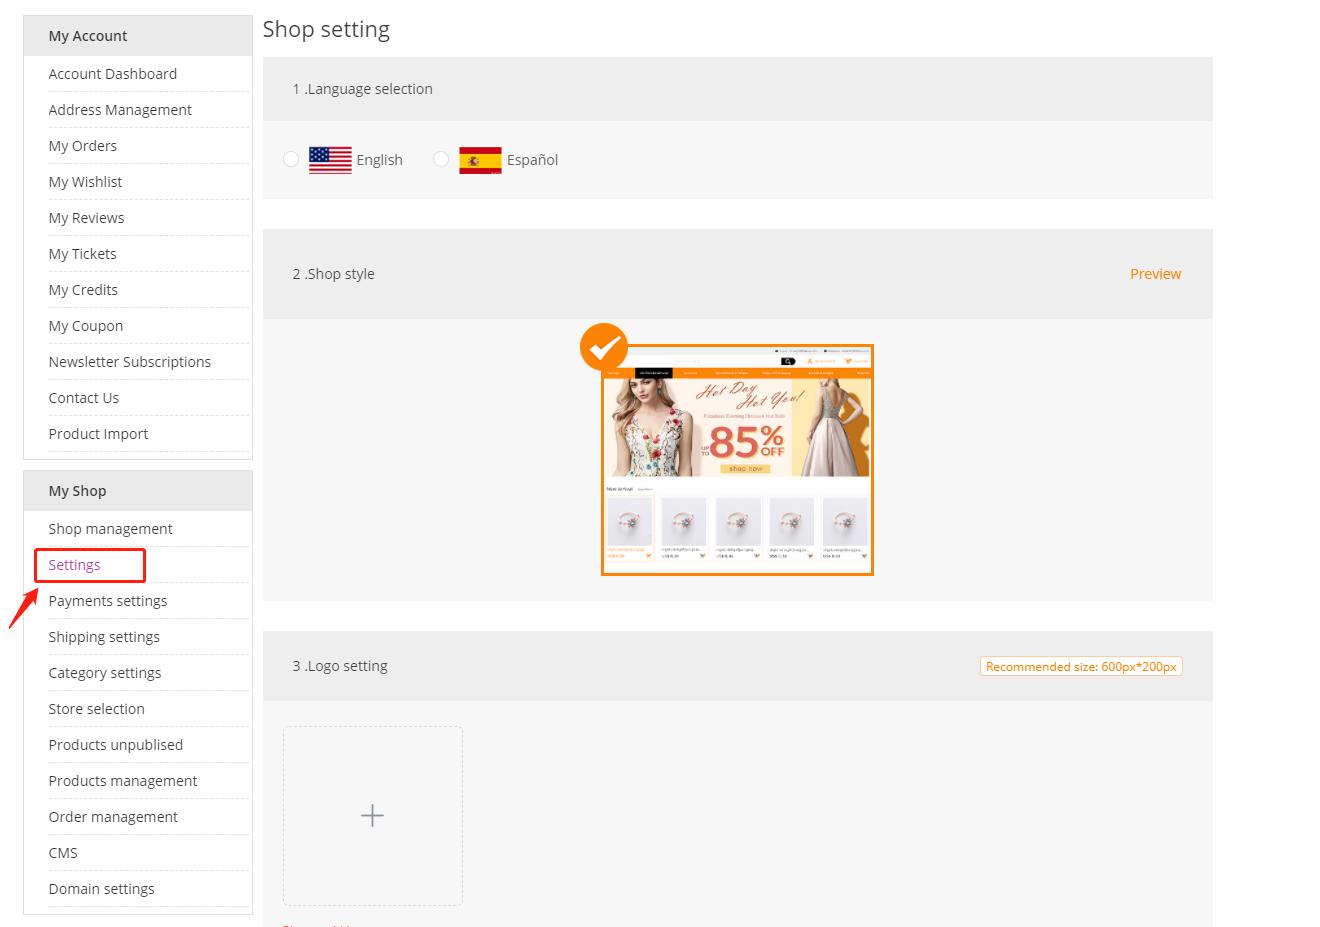
Go to “setting”, select your store language, store style (theme), add logo, favicon, product processing time settings, contact information, website introduction, and SEO content.
Language selection: Your shop language selection – English or Spanish.
Shop style: The templates we provide will give you shop design ideas quickly and easily. At present, you may only see one shop theme option, and we will provide more themes to choose from later.
Logo setting: A logo highly summarizes the image or culture of the brand. It generates public association through its image and color, so as to be organically connected with the entire company. You can design online by yourself or hire a designer to create your own logo and upload it. Recommended size is 600px*200px.
Favicon setting: Favicon is a small icon displayed on the left side of the browser’s address bar, which is convenient for distinguishing different websites. The image format uploaded by Favicon is ico. The upload size is 35px*35px or 60px*60px.
Product processing time setting: The processing time will be displayed in your store and is your estimated processing time for customer orders. That is, the estimated time when you actually receive the Nihaojewelry order. Please fill in according to your purchase experience in Nihaojewelry.
Your customer’s delivery time = processing time + shipping time.
Contact information: Information that customers can use to contact you. This information will be displayed on your homepage.
Website Introduction: Your online shop introduction. The introduction will be displayed on the homepage.
SEO settings: SEO is search engine optimization. We recommend that you edit titles, keywords, and descriptions for your homepage that are beneficial to search engines and attract customers.
How to find your store url?
The domain name is like the doorplate of a website, also known as the “website” or “url”. Potential customers can quickly identify through it, and accurately enter the website. The basic principles of a good domain name are simple and easy to remember. Because it allows users to remember deeply, increase more repurchase rates and attract more potential customers.
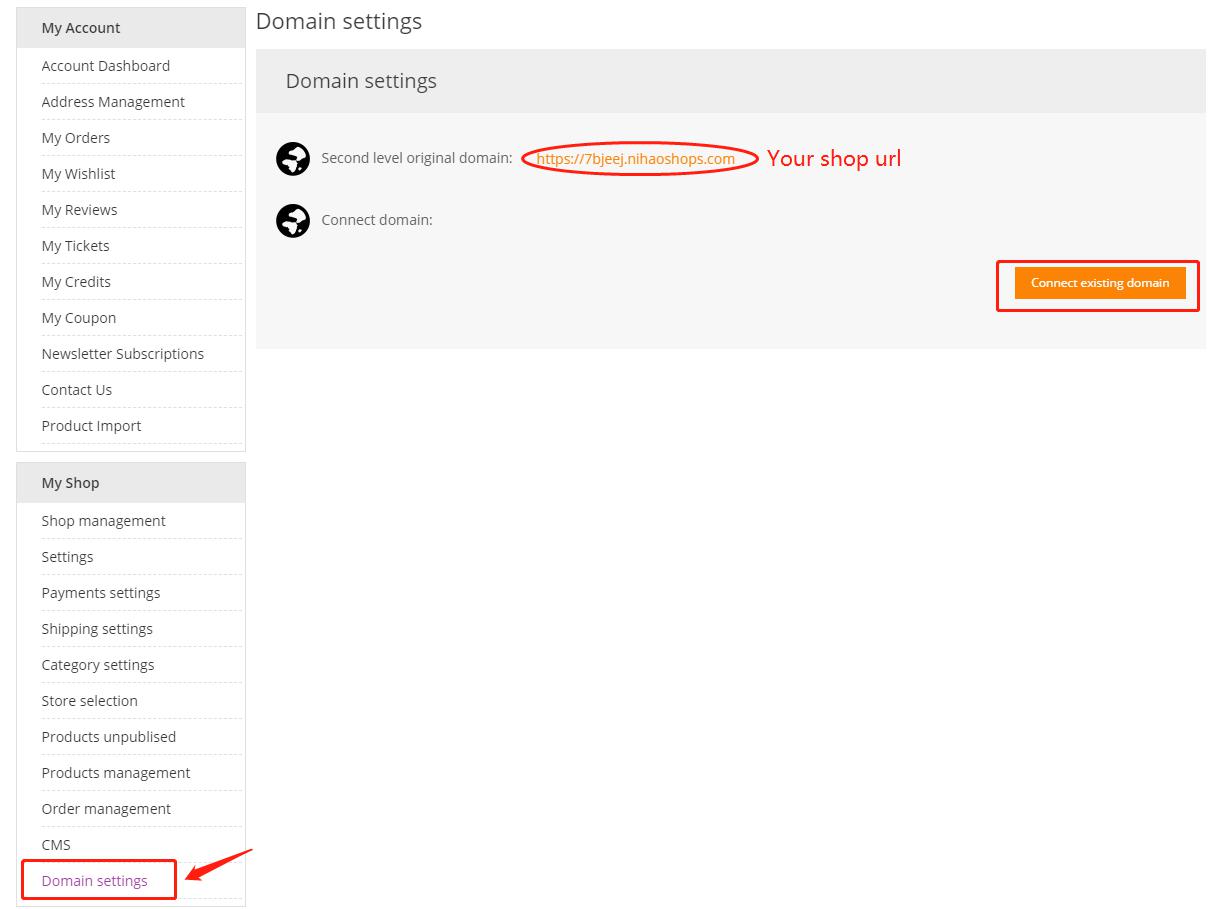
If you did not purchase a custom domain when you applied for Nihao’s online store. Go to “Domain settings”, you can find the domain name we generated for you here, which is your store link.
Connect a custom domain
After purchasing a domain name from a third-party domain name provider (such as GoDaddy), you need to connect your domain to your store. Connecting your domain points your URL to your Nihaojewelry store so that customers can enter that URL into their web browser to visit your online store.
How to connect a custom domain step by step?
Step1. Connect your custom domain
From your Nihaojewelry admin, go to My shop>Domain settings
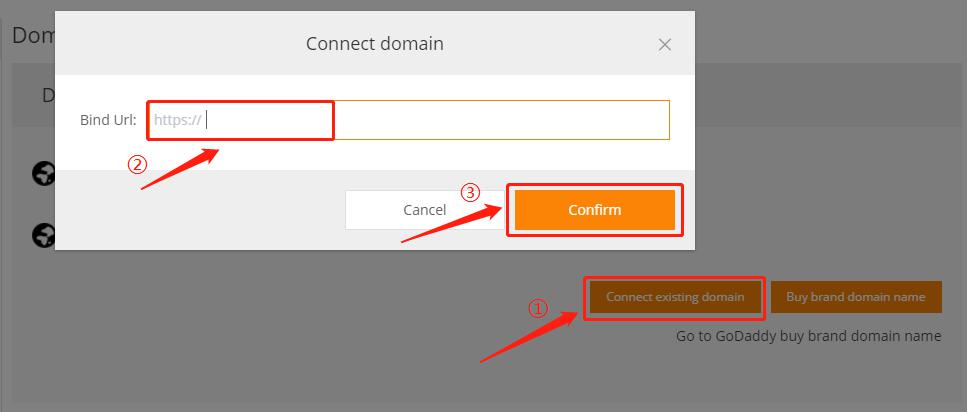
Click “Connect exciting domain”.
Enter your domain, such as www.lisashop.com, and click “Comfirm”.
When you finish step one, we will send the record contents to your mailbox. Please wait for one business day.
Step 2: Add two CNAME records, two TXT records and an A record in your third-party domain provider account
1.Log in to your account on your domain provider’s website.
2. Find the DNS settings or domain management zone.
3. Add 2 CNAME records.
You need to enter 2 detailed CNAME records. Point the CNAME record host named “www” to “shops.storeee.com“. And point the CNAME record host named “m” points to”shops.m.storeee.com“.
4. Add 2 TXT records.
Point two TXT records host named “_dnsauth” and “_dnsauth.m” to the TXT value number we send to you separately. (For details, please refer to the following examples)
5. Add an A record.
Point the A record host named “@” to an IP address we send to you.
Please allow up to 12 hours for your changes to take full effect.
Take GoDaddy as an example:
Log in to your GoDaddy domain control center.
Select your domain to access the “domain settings” page.
Under “Other settings,” select “Manage DNS.”
1.Select “Add” under the record table to add two CNAME records.
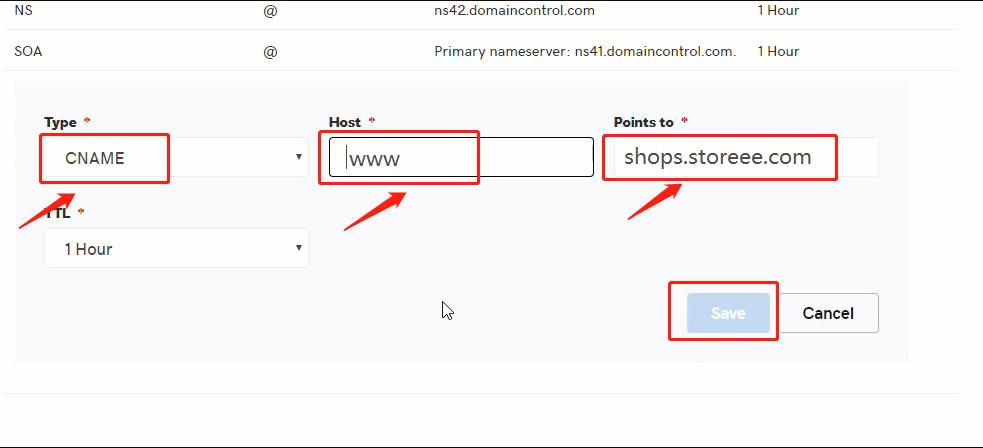
CNAME record one:
Type: CNAME
Host: www
Point to: shops.storeee.com
TTL: Determine how long the server should cache information. Fill in according to different needs.
CNAME record two:
Type: CNAME
Host: m
Point to: shops.m.storeee.com
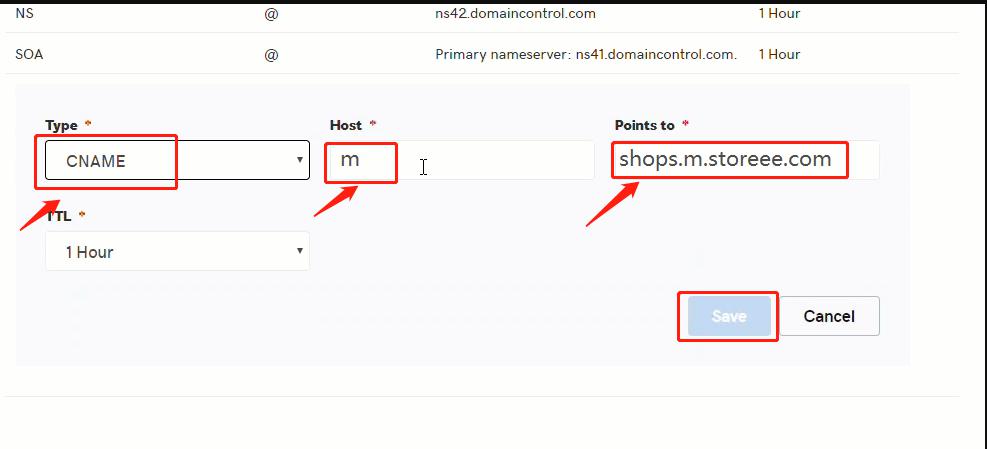
Click “Save” to save your new CNAME.
Please allow up to 48 hours for your changes to take full effect globally.
Note: If the host is not set to “www” and “m”, your domain may not be able to access the store.
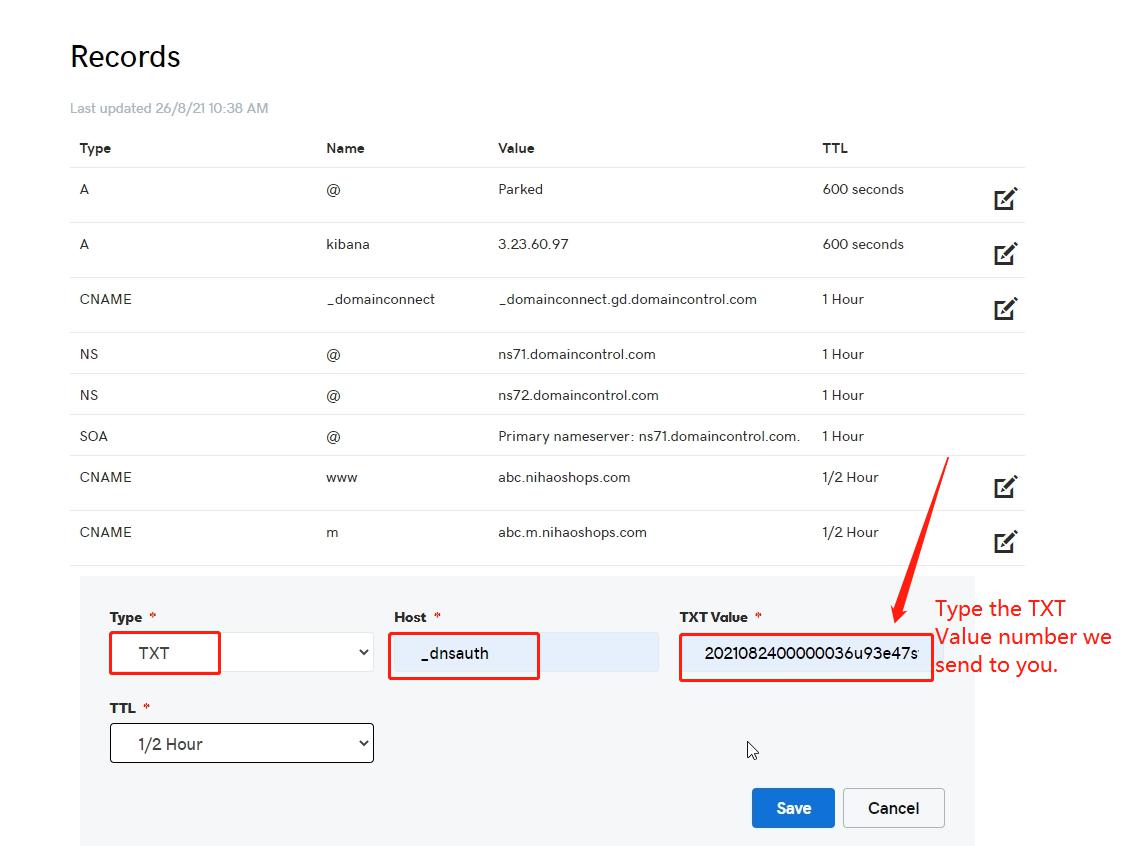
2. Click Add under the records table to add two TXT records.
TXT record one:
Type: TXT
Host: _dnsauth
TXT Value: The corresponding TXT value number we sent to you
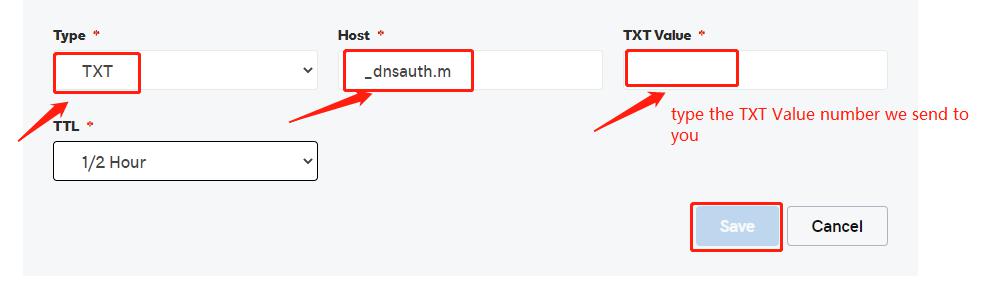
TXT record two:
Type: TXT
Host: _dnsauth.m
TXT Value: The corresponding TXT value number we sent to you
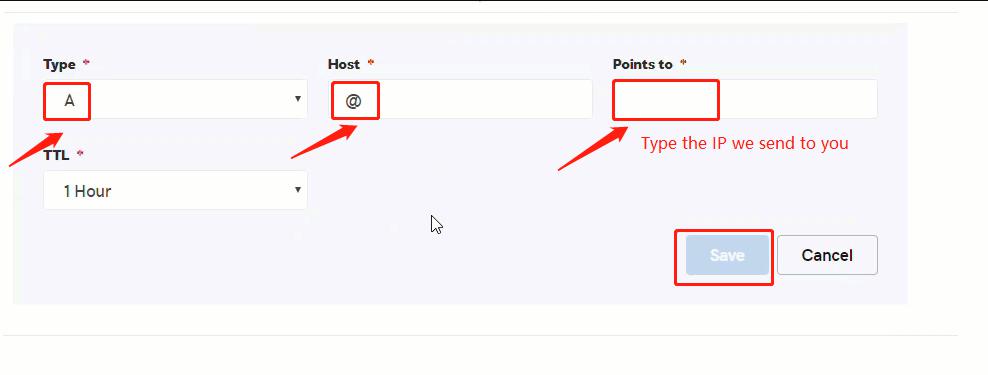
3. Continue to add an A record.
Type: A
Host: @
Point to: The IP we send to you
After completing the settings, you will see 5 records as shown in the figure below.
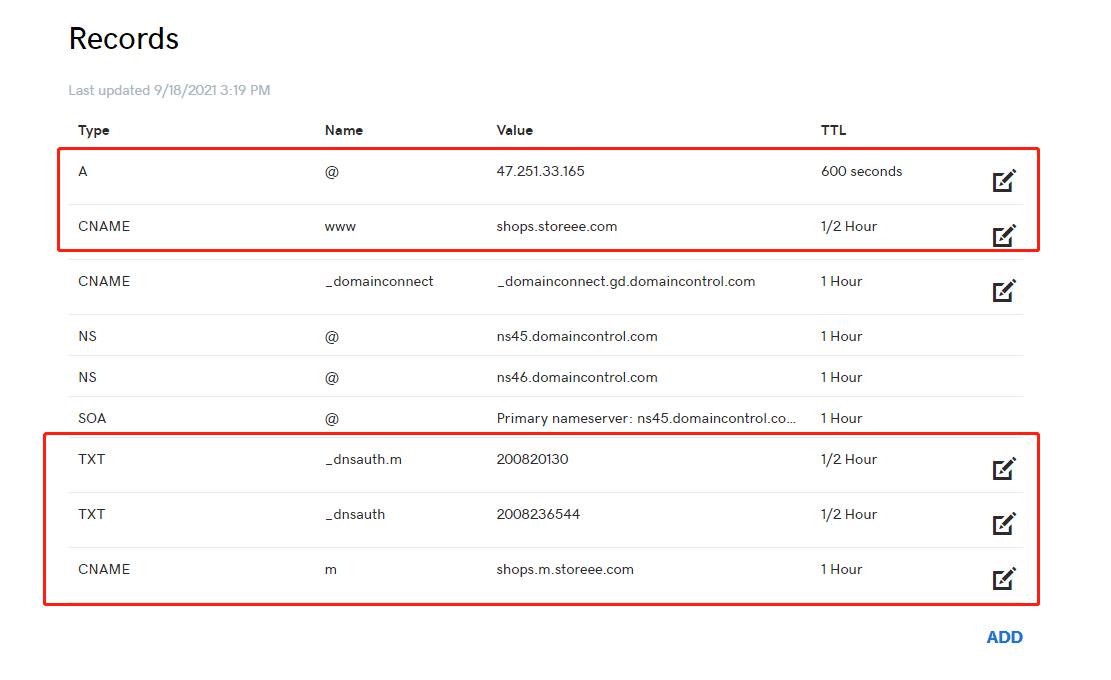
After finished, please allow up to 12 hours for your changes to take full effect.
If you have trouble setting up your domain, please contact your domain provider for help.
To confirm that your domain is connected to your store, please enter your custom domain to verify. (Your changes may take 12 hours to take effect)
How to set up and manage your online store?
Add category
A reasonable category structure ensures that consumers can easily and quickly find the products they want.
Go to “Category settings” and set different levels of categories. You can set up three different levels of categories.
Click “Default Category” and then “…”.

Enter the category name and click √.
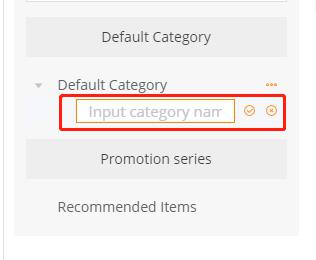
Click “+” to continue adding categories at the same level.
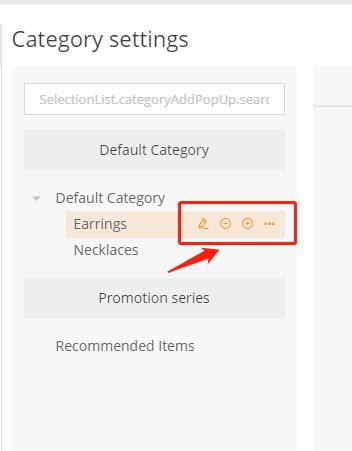
Click the established category to edit the category. The following four icons respectively represent category name edit, delete category, add category of the same level, and add subcategory.
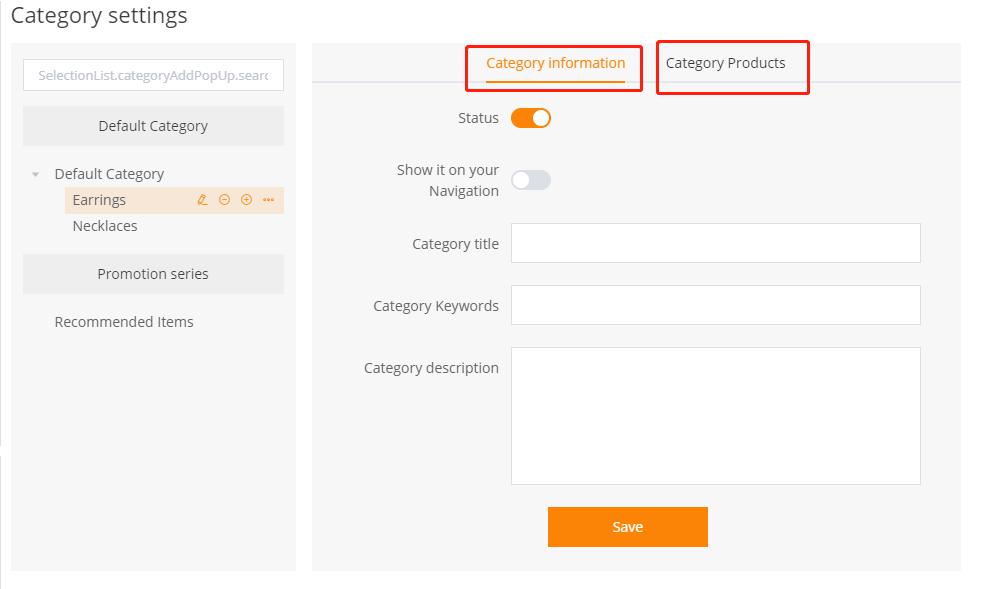
On the right are the information of this category and the products under the category.
Status: Whether the category status is on. The “on” status is orange. The “off” status is gray.
Show it on your Navigation: Whether to show it in your website navigation. “Display” is orange, and “Don’t display” is gray.
Category title, keywords, description: Category name, keywords, description used for SEO.
Your shop theme has a “recommended items” section by default. After the product is released, you can set it in the category product.
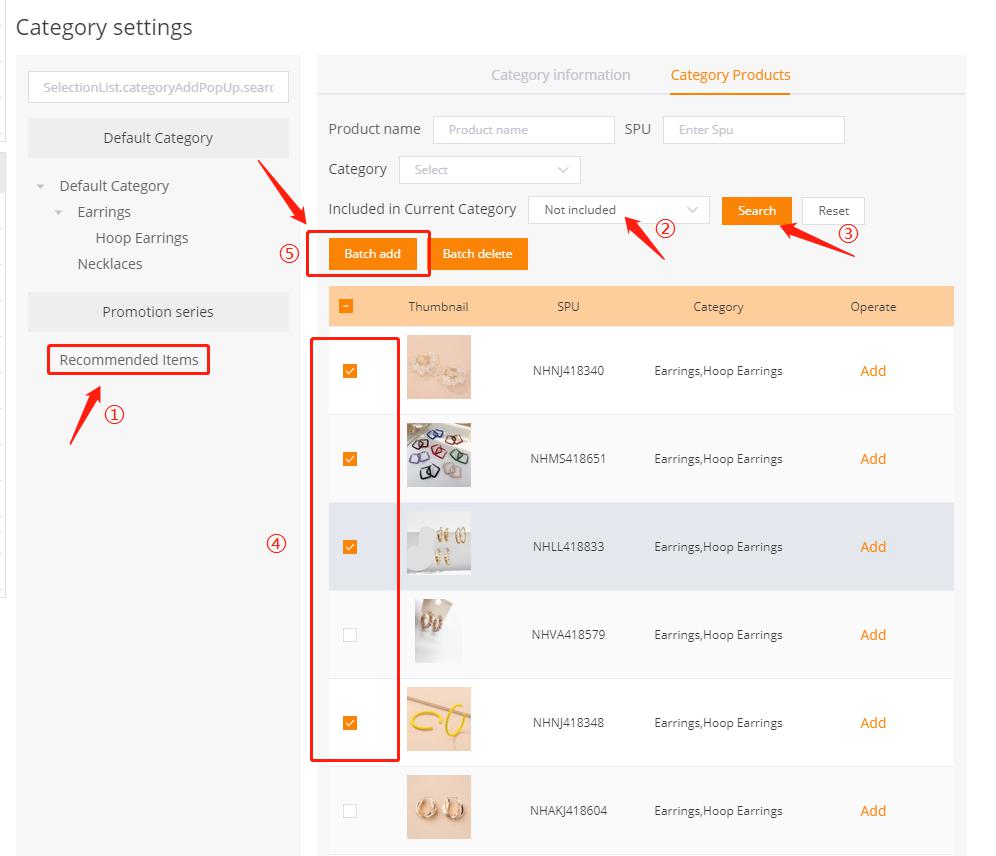
How to add “Recommended items”?
- You need to add products first.
- Back to Category settings, click “Recommended items”.
- Search for the product you want to add: You can search by product name, spu, category to find the product you want (the following figure searches by products that are not in the recommended items)
- Select the product to be added.
- Click “add” or “batch add” to complete.
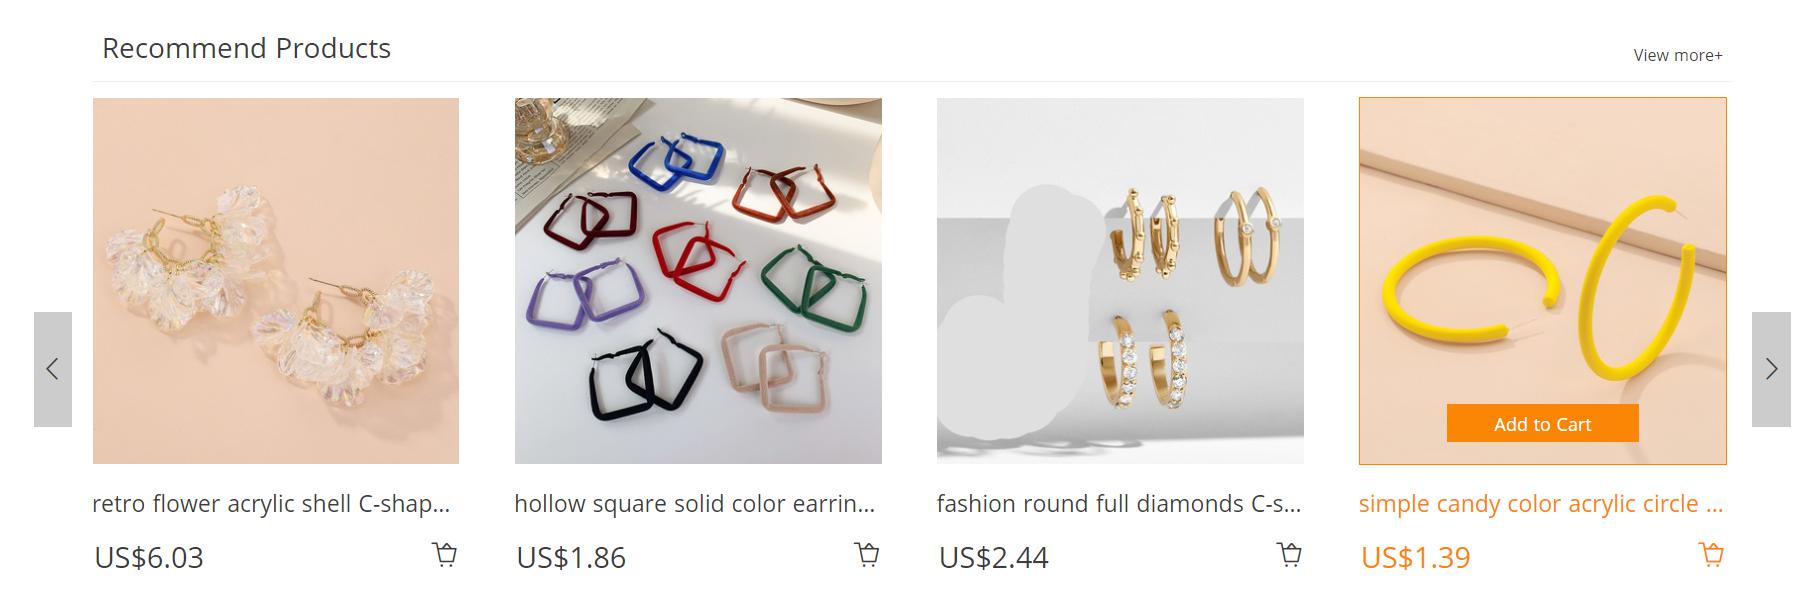
You will see this content on the homepage of your store:
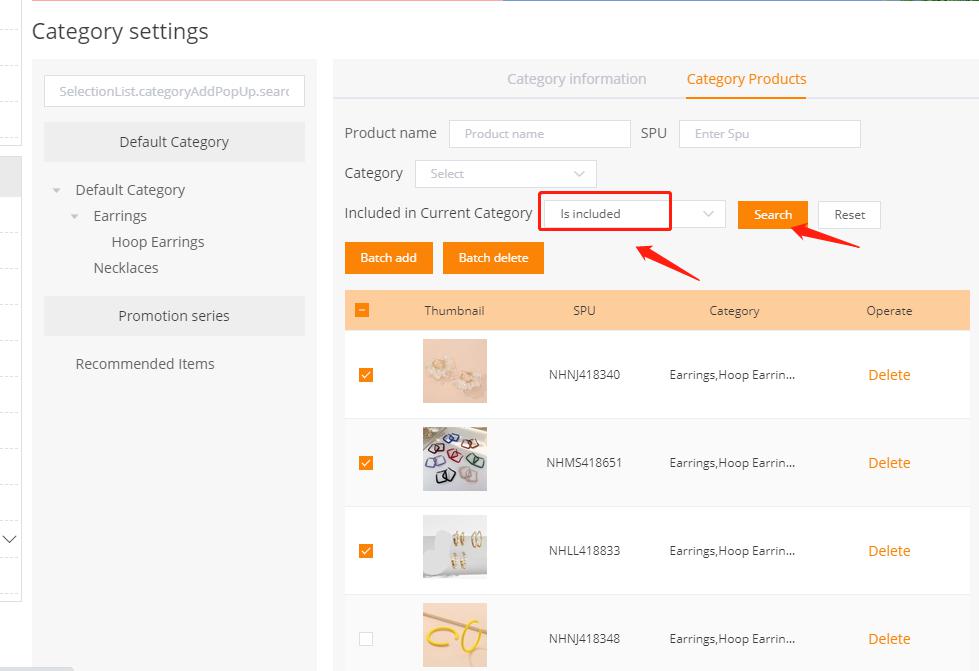
If you need to modify “recommend products”, search by products under this category, select and delete.
Add your product
Adding a product is one of the most important steps you do first.
Go to “Store selection”. On the right is the instruction on how to import products from Nihaojewelry to your shop.
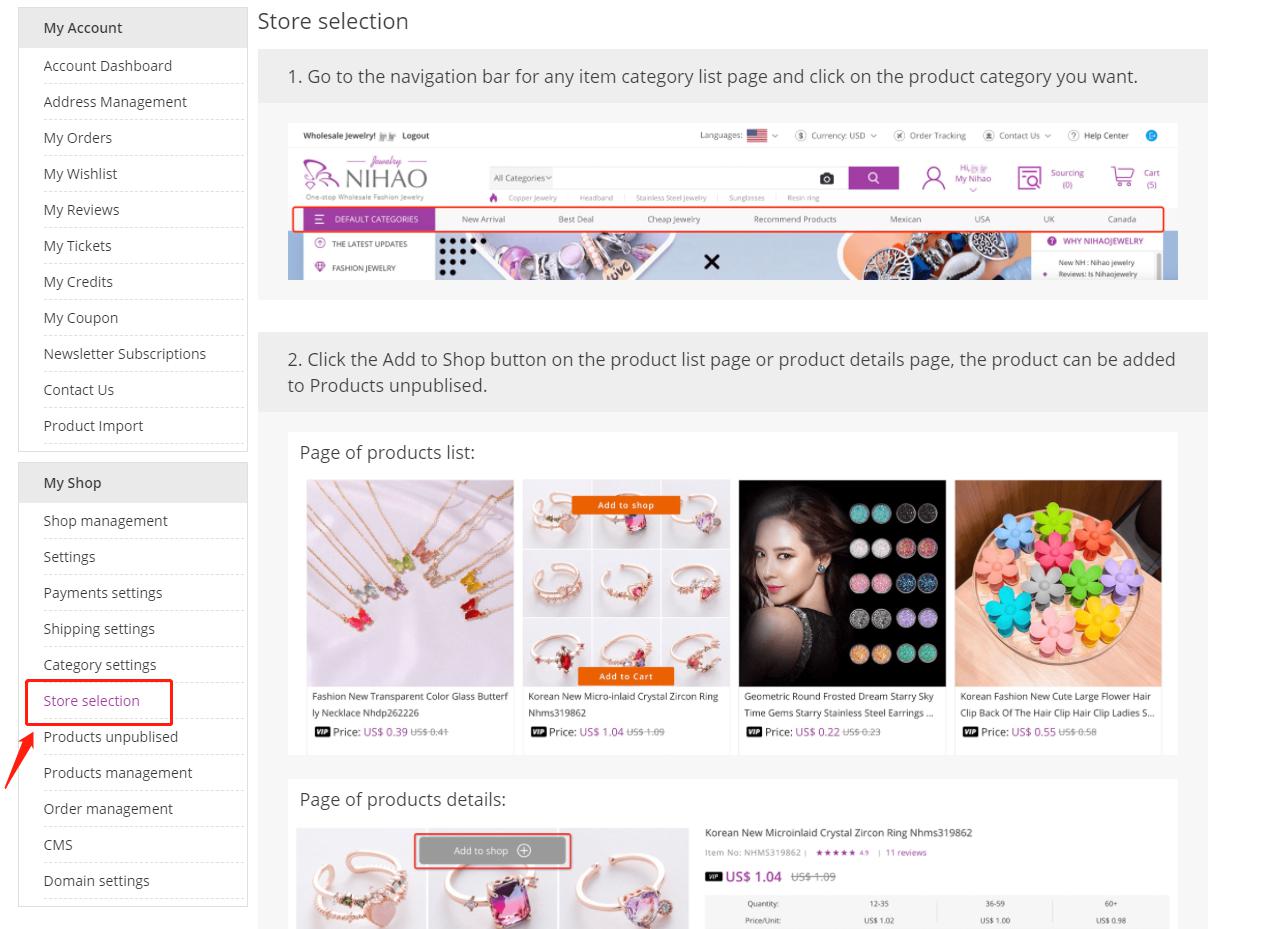

Click “Select right now” to enter the Nihaojewelry website. You can add products to your shop from Nihaojewelry’s category page, product page. Just move the mouse to the product picture and click “Add to shop”.
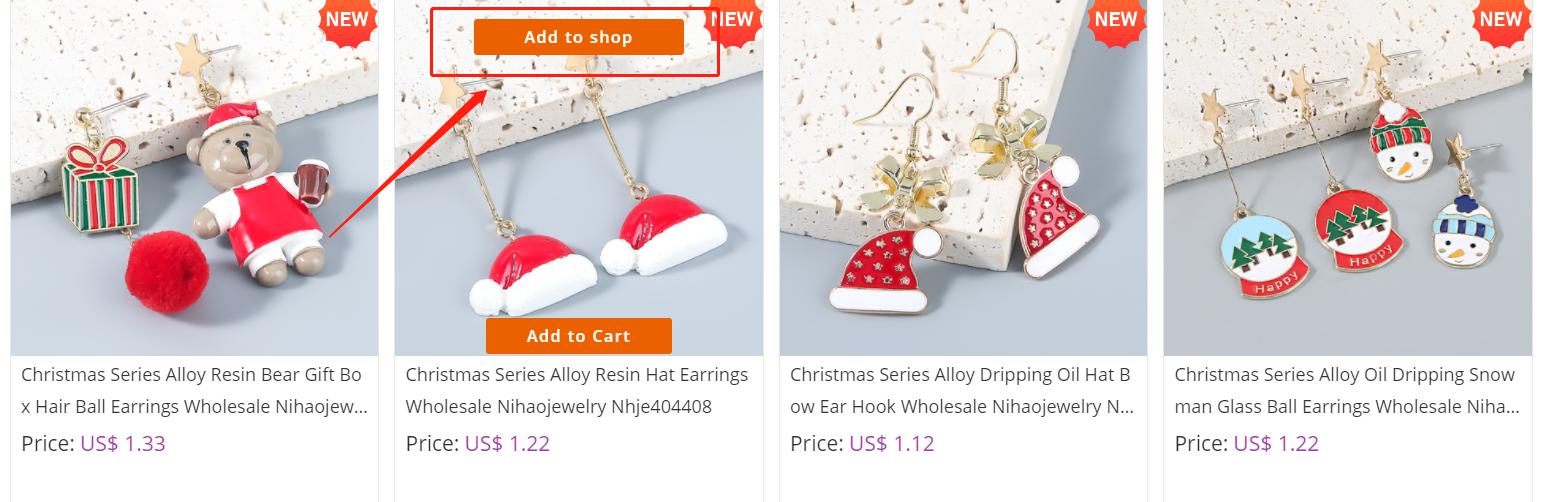
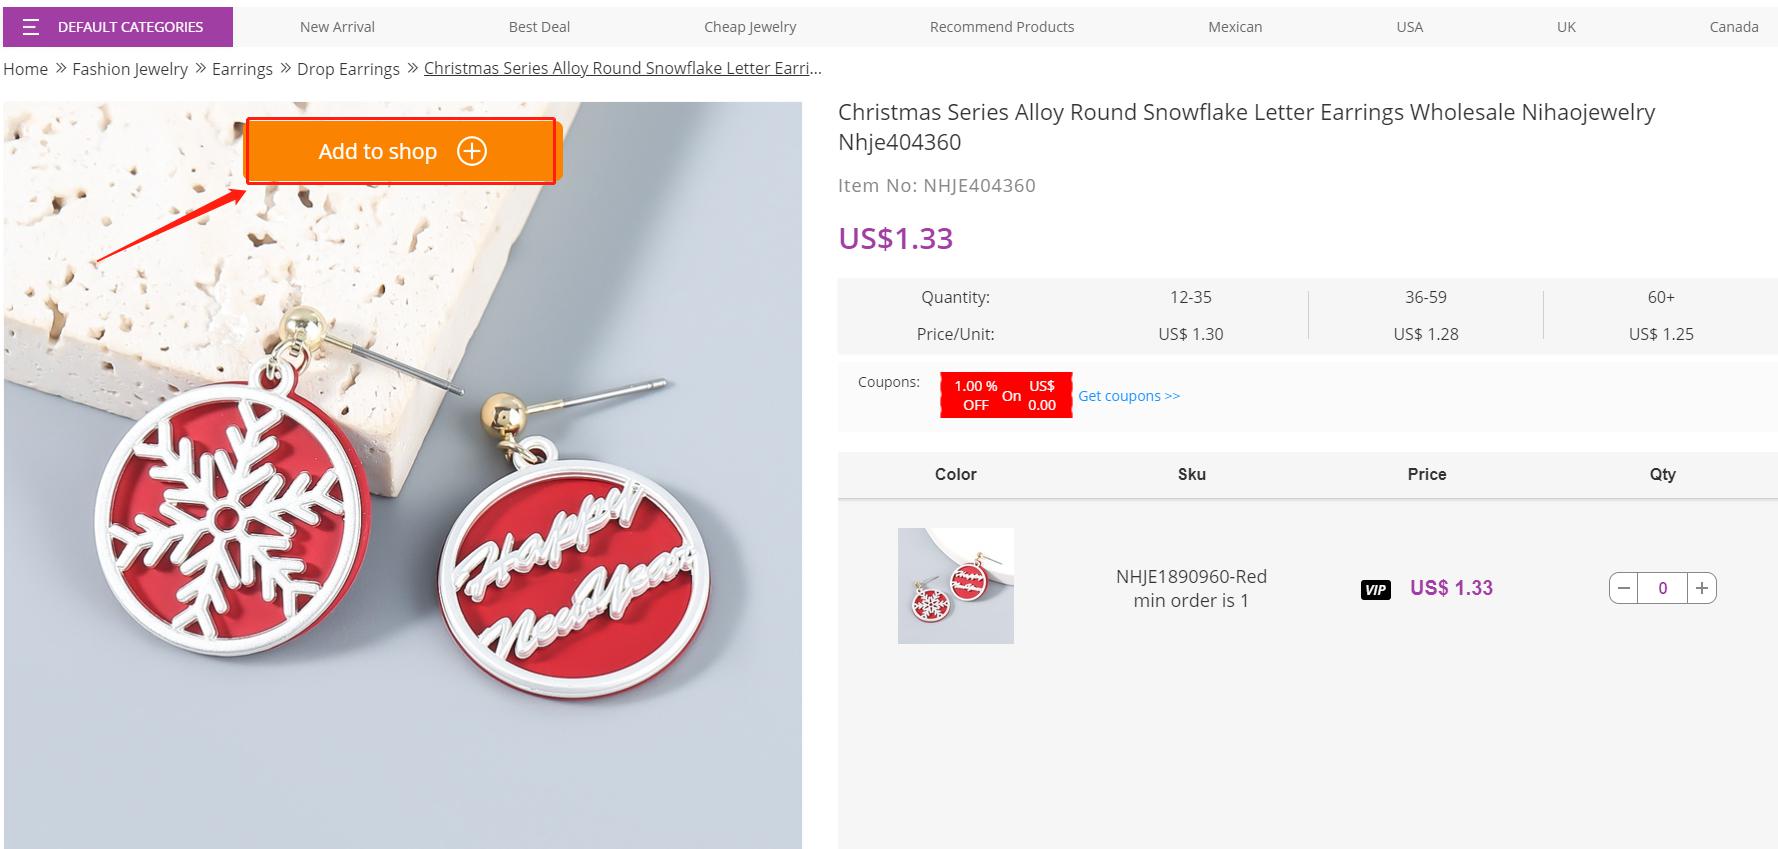
The products you import from Nihaojewelry will not be displayed directly to your store. You will see them in “product unpublished”.
Edit, publish and delete products (unreleased products)
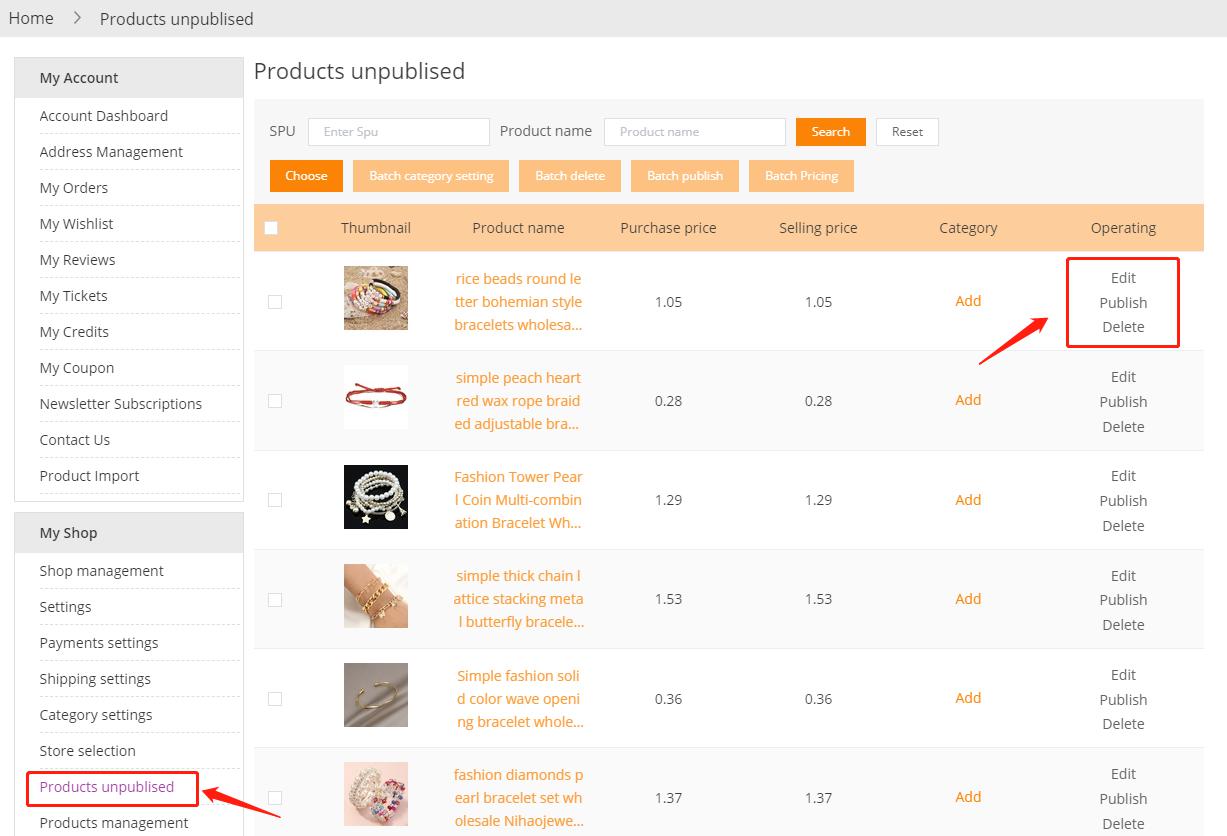
You can edit, publish and delete a single product.
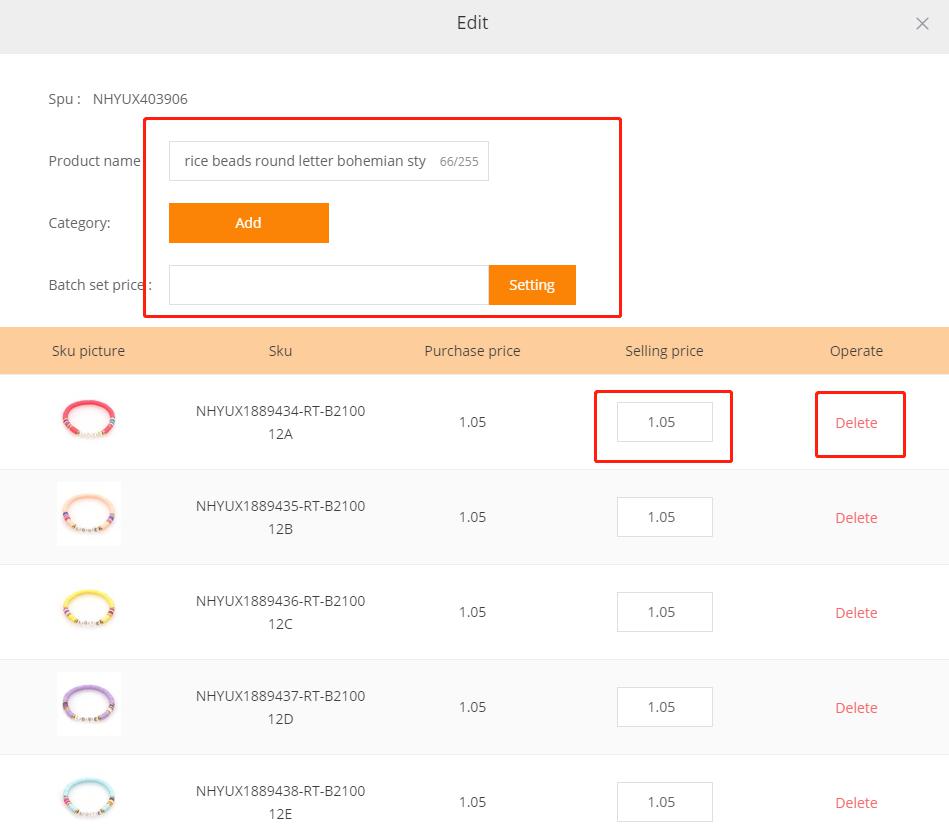
In the “Edit” pop-up window, you can modify the product name, add or modify categories, modify the product price, and delete SKUs.
If all SKUs are set to a uniform price, you can enter the price in “Batch set price” and click “setting” to modify all SKUs to a uniform price.
If different sku has different prices, you need to fill in the corresponding price in the corresponding “selling price”. (All product prices are in U.S. dollars)
Batch Modify products
It is too troublesome to modify each product individually. You can also set categories, release, delete, and price for different products in batches.
Select products need to operate, then click on the corresponding operation.
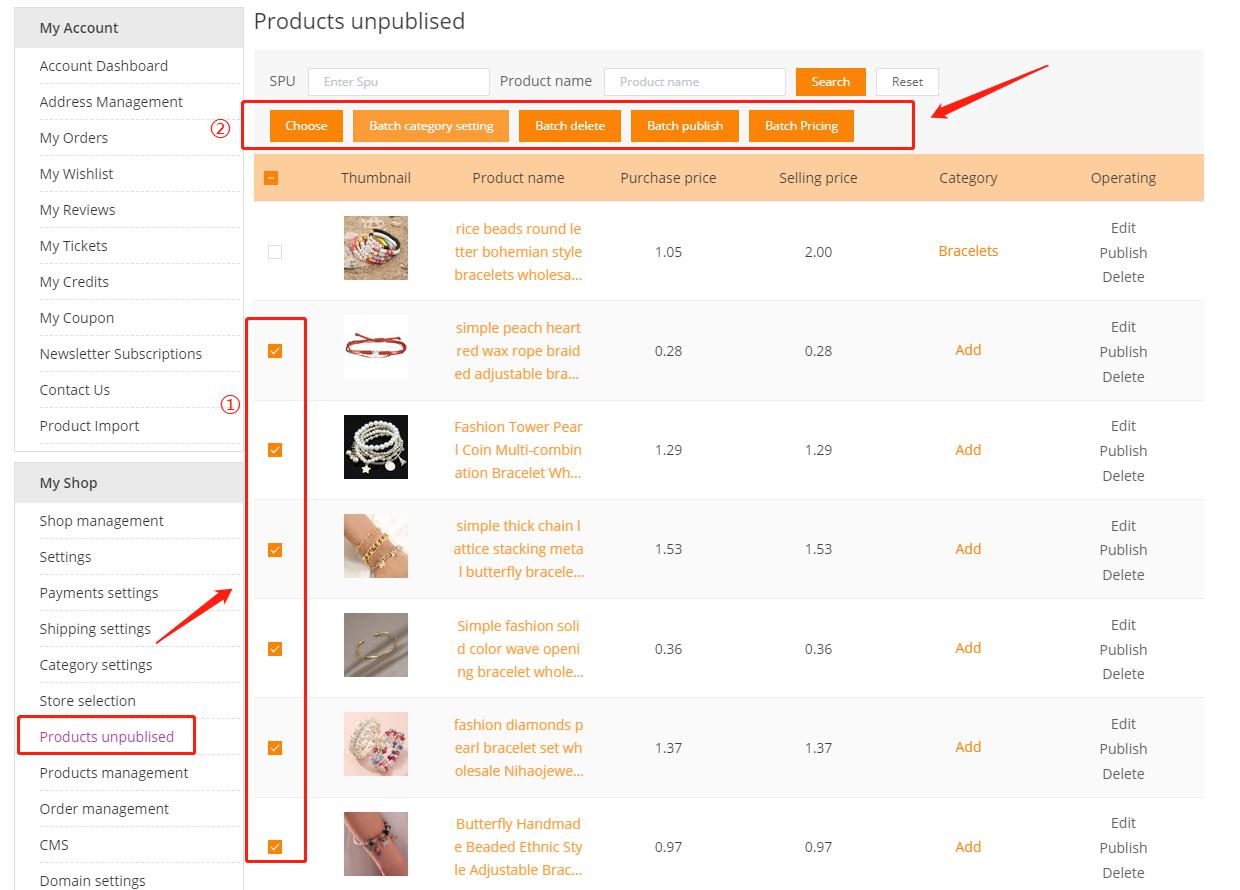
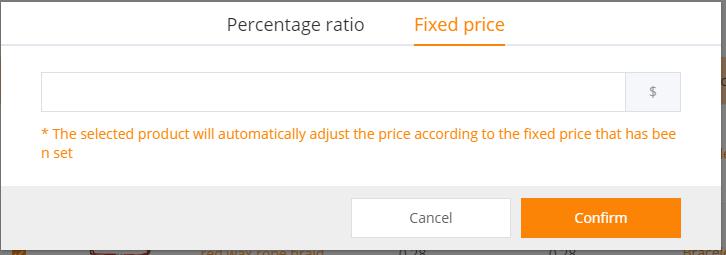
In “Batch pricing”, we provide two options: proportional pricing and fixed price.
Percentage ratio: batch pricing based on the purchase price according to the price ratio. That is, the product price = purchase price * Percentage ratio.

Fixed price: The price you choose will be the fixed value filled in.
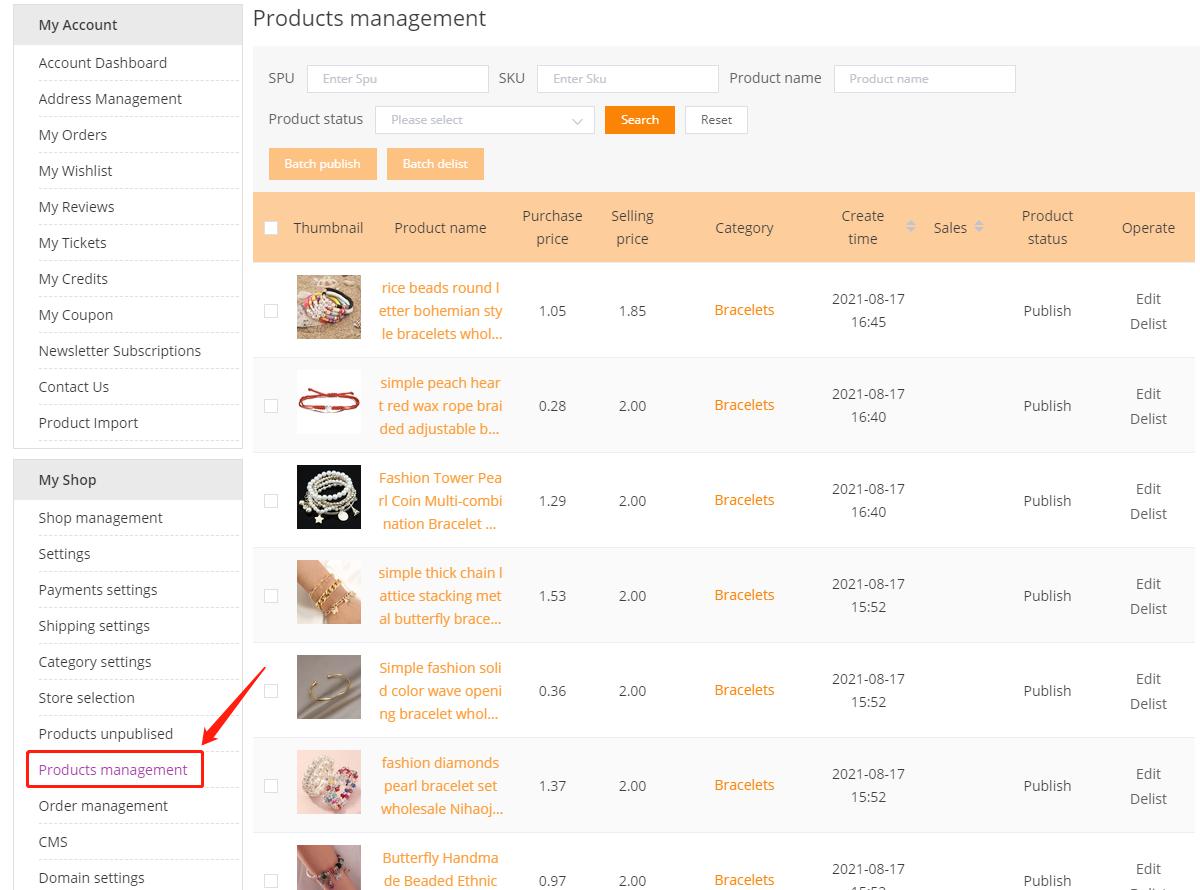
Edit and delete products (released products)
You can edit and delete released products in “Product management”.
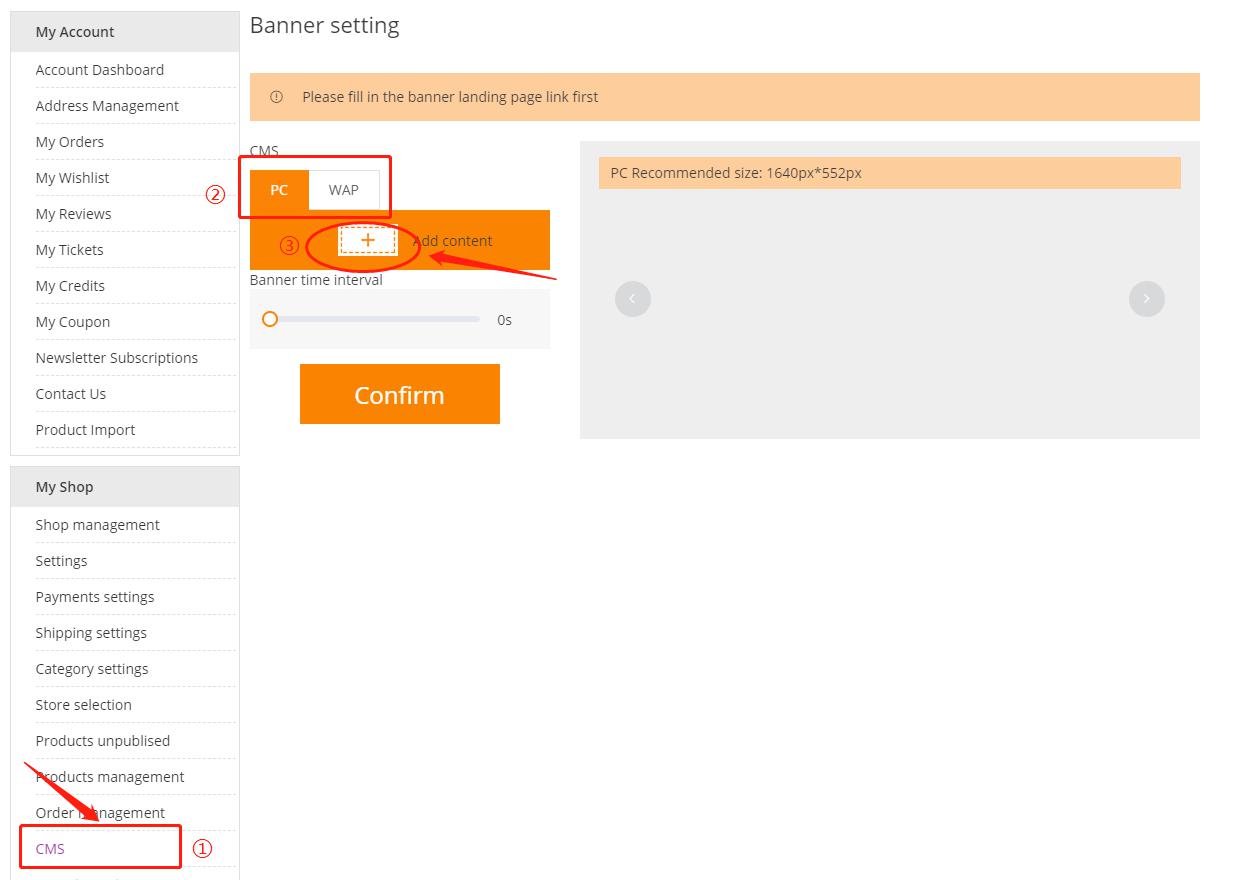
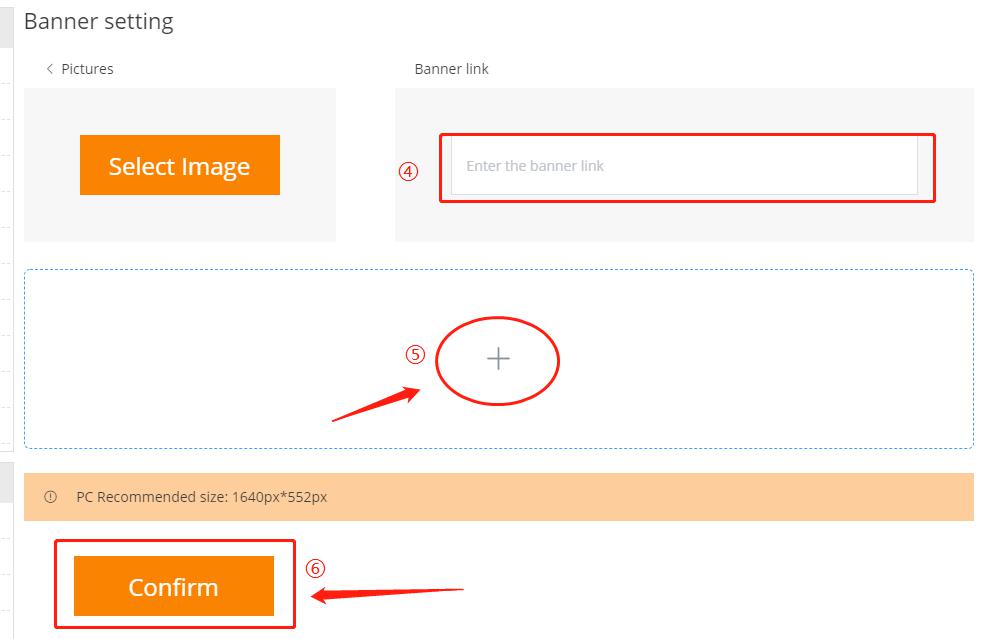
Banner settings
Banner will give people the first impression of your website. It can be used to display new products in the shop, best-selling products, and promotions. Use nice and interesting carousel slides to attract consumers to buy your products.
- Click “CMS” to start Banner setting.
- Choose PC or WAP (mobile web page).
- Click “+”
- Add a banner link. (the page you want the banner to link to).
- Click “+” to upload banner
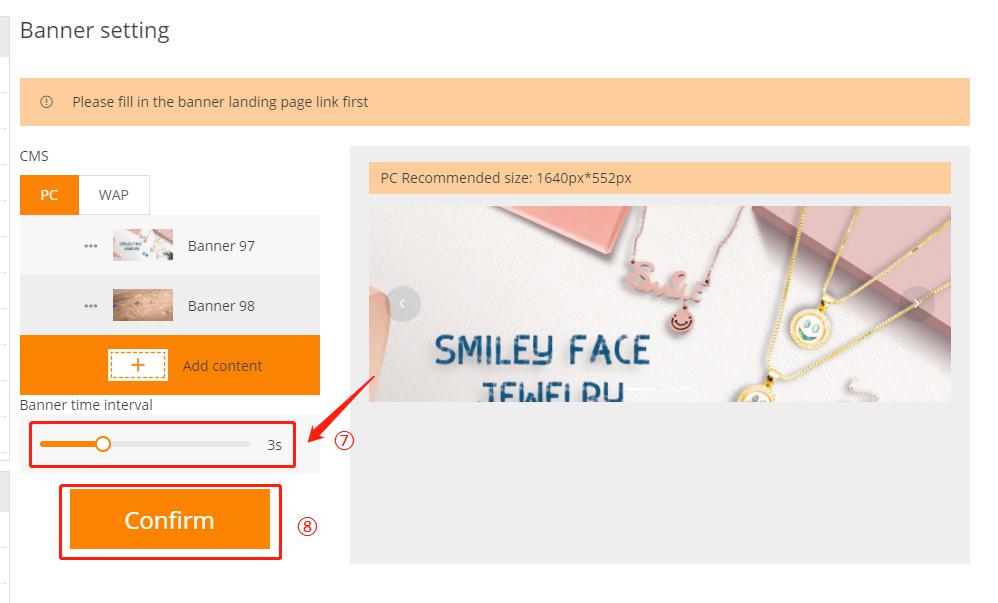
- Click “Confirm”
- Modify the banner interval
- Click “Confirm”
Footer content design
The website footer is the consistent content area at the bottom of every page of your website. Although page footers receive less attention than the top of the page, they are still used quite a bit. What can you add? Privacy policy, terms of use, contact information, etc. The two most important links in the footer of any website point to the “About Us” and “Contact Us” pages. Users will want to know who you are and what your company or brand is about. The page footer makes it easy to find this information. Many people also want to learn about your team members and how to contact them.
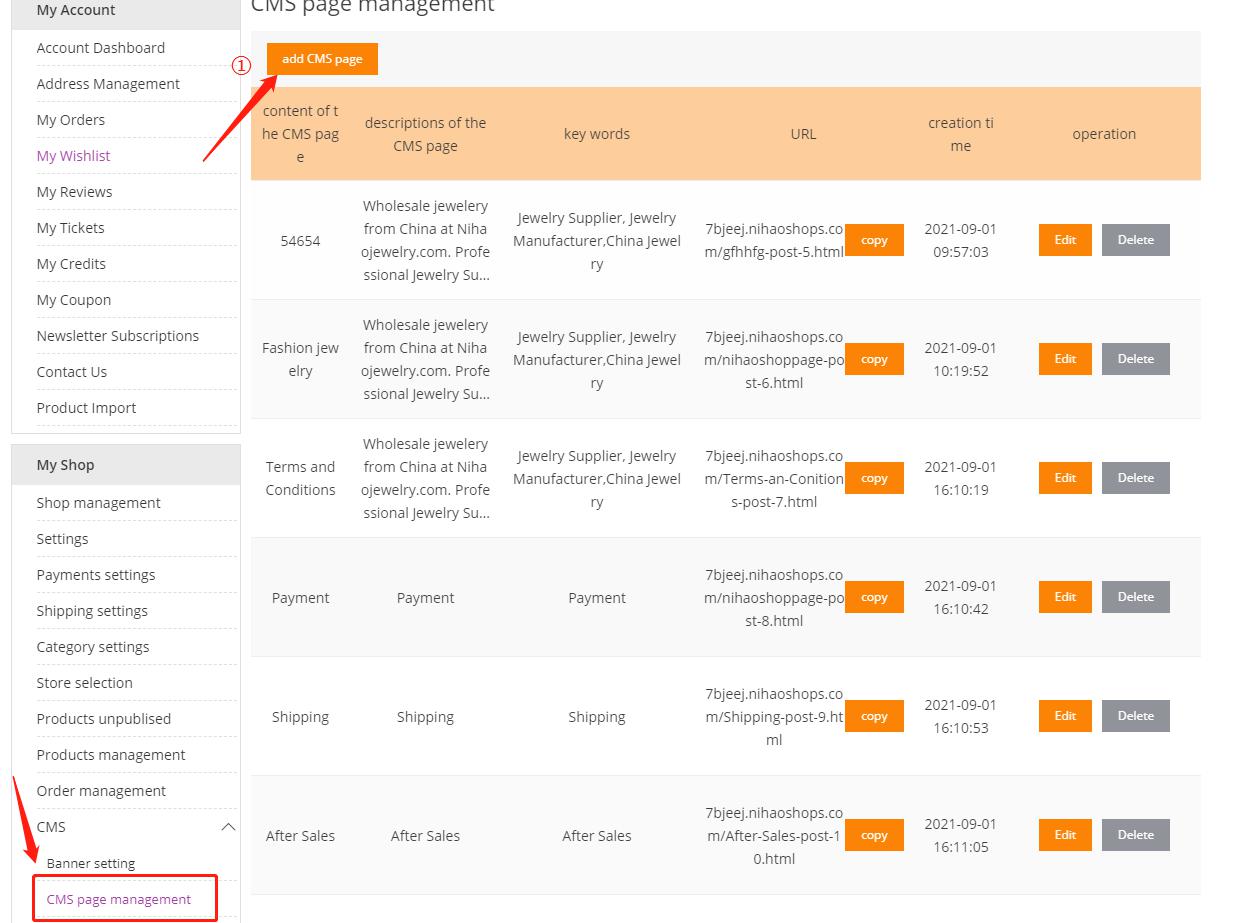
How to set Footer content on Nihaoshop?
1. Go to My shop>CMS>CMS page management to add content.
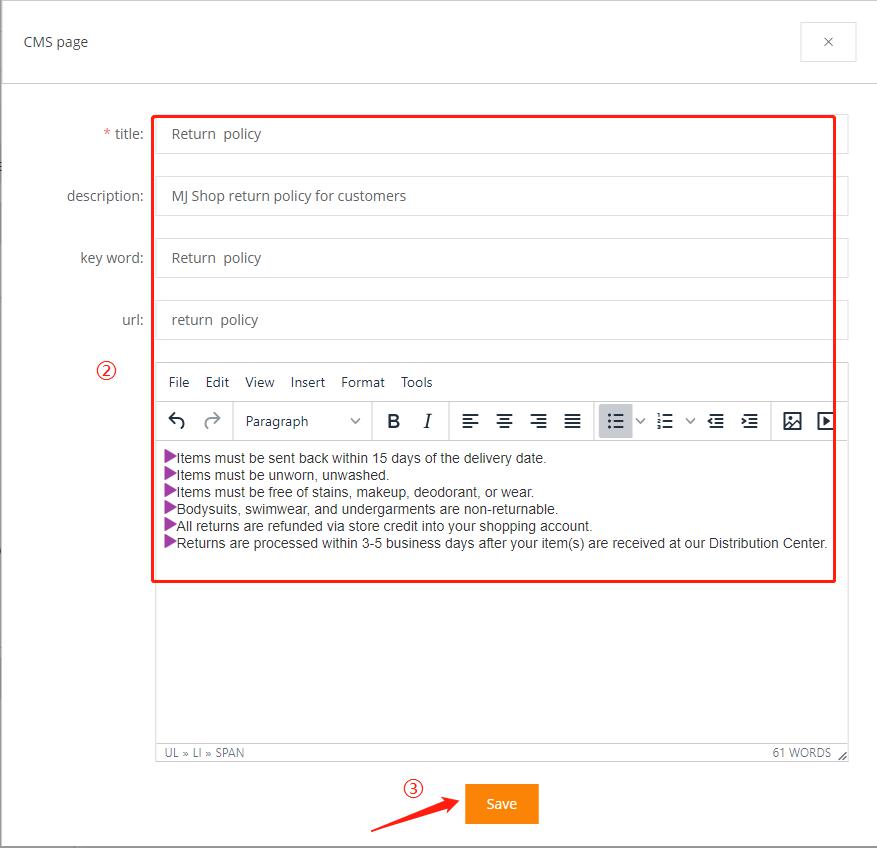
Click “add CMS page“, enter the title, description, keywords, url and specific content. Click Save to confirm.
You can copy the url to view the page.
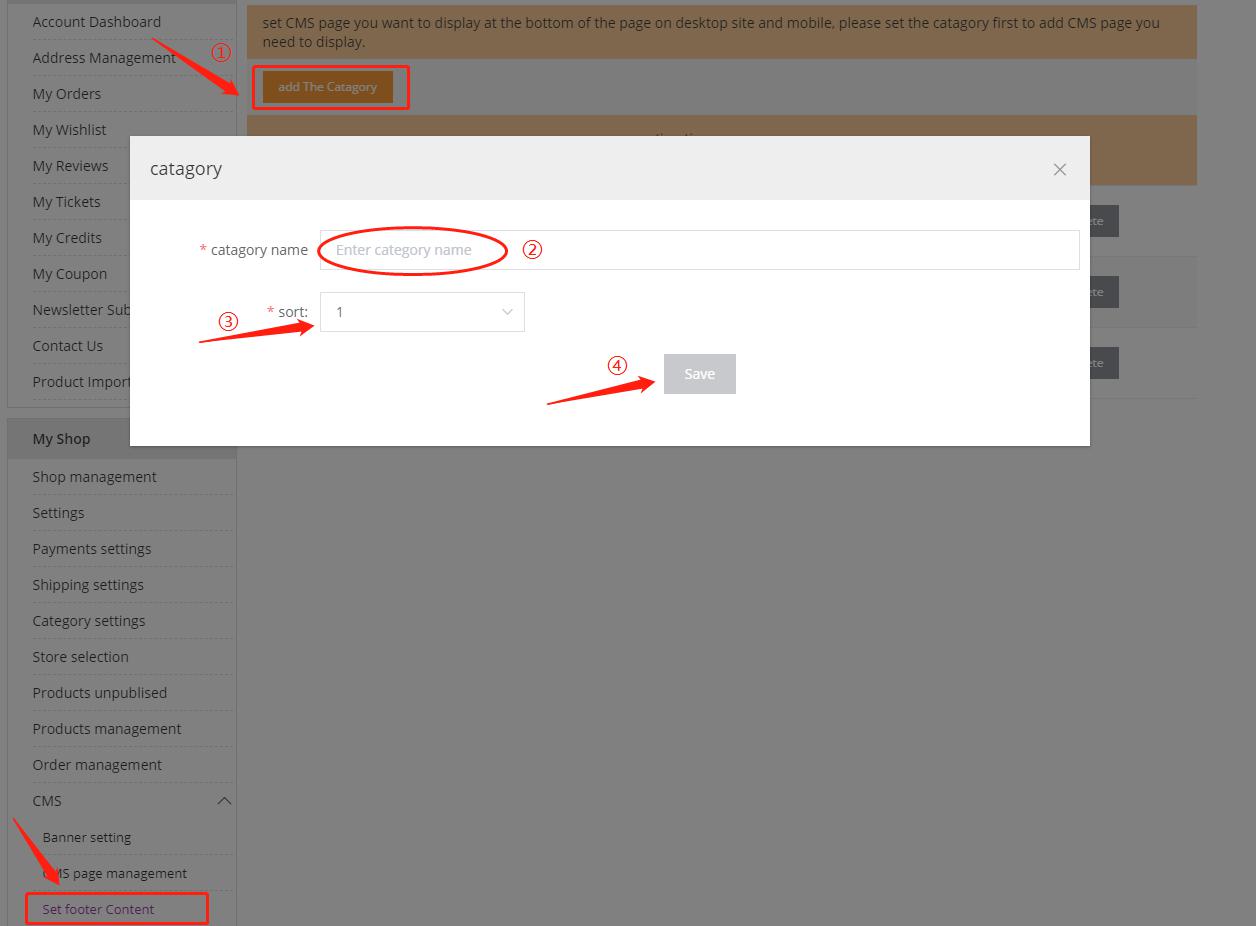
2. Go to My shop >CMS> Set footer Content to add a category title (Such as Customer Service, Nihaojewelry, My Account, Why Choose Us? shown in the figure below)

Click “add the catagory“, enter the name and modify the sorting (numbers from small to large, sorting from left to right). Click “save” to finish.
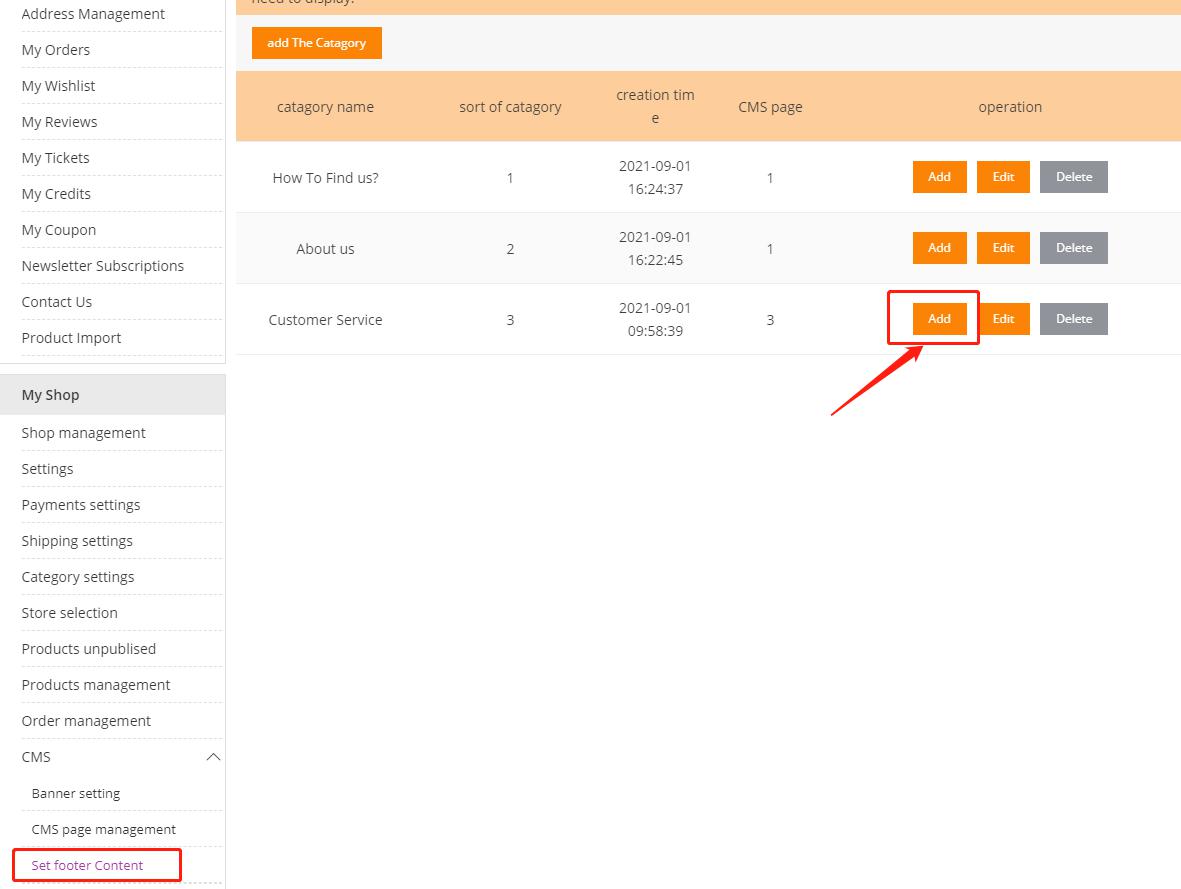
3. Add content under the corresponding category.
Select category and click “Add“.
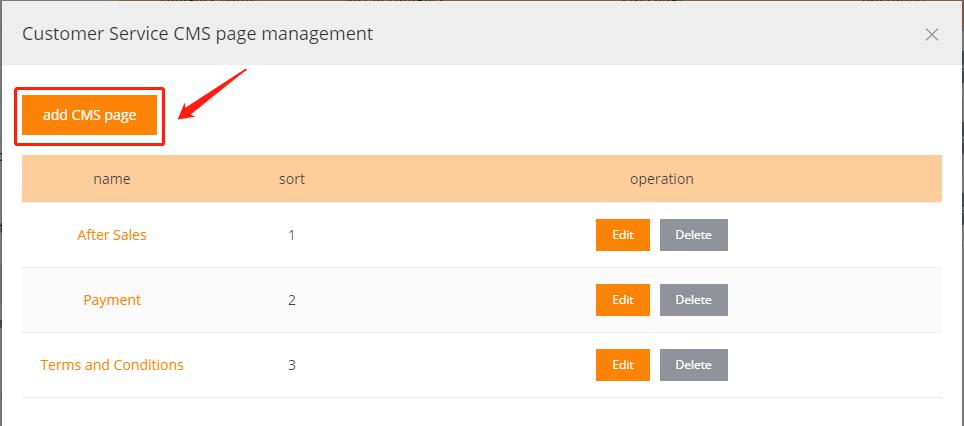
Click “Add CMS page“.
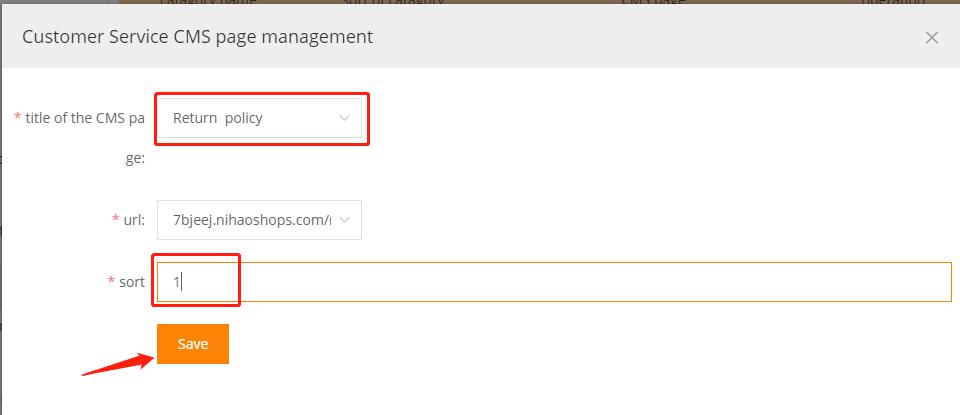
Select the content title from the drop-down menu and enter the sort order.
Click “save” to finish.
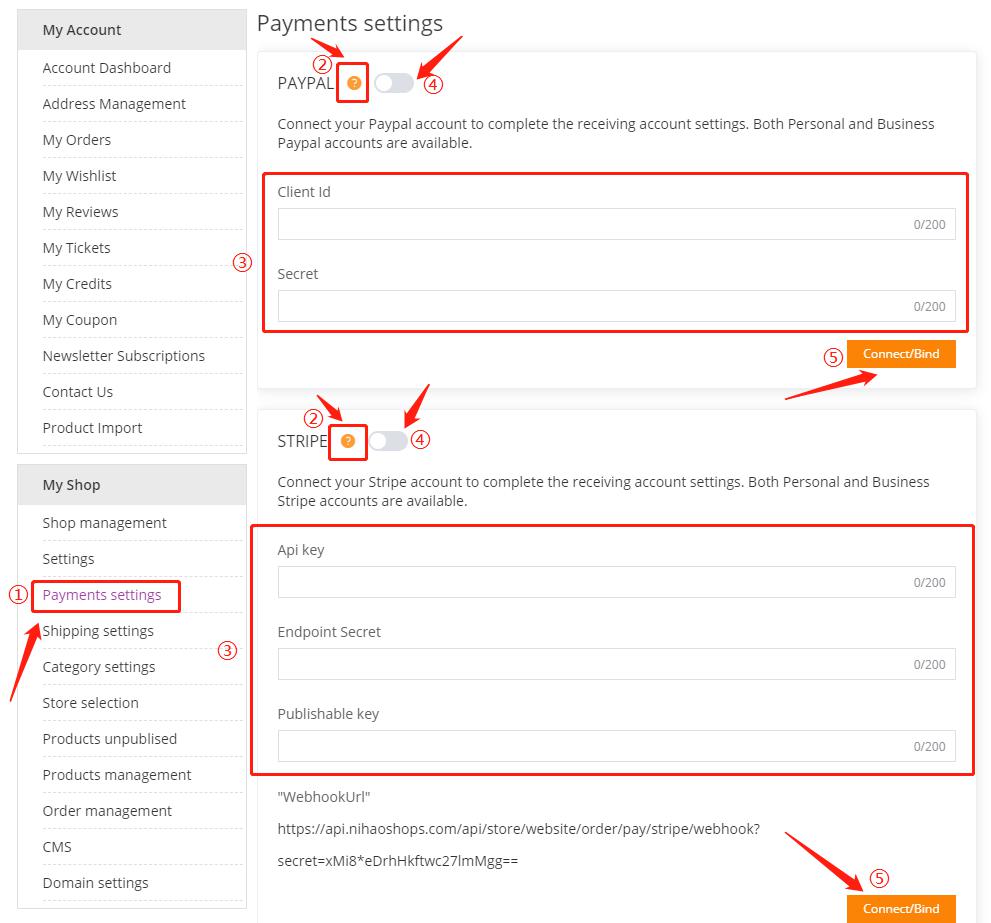
Set up your payment
There are currently three payment methods you can set up in your store: Paypal, Stripe, and bank transfer.
- 1.Go to “Payments settings”
- 2. Choose one or three payment methods. Click ❓ to view the detailed tutorial to get “Client Id” and “Secret” for paypal, or “API key”, “Endpoint secret”, “publishable key” for stripe. There are similar tutorials for bank transfers
- 3. Fill in the content in the corresponding place.
- 4. Turn on the switch.
- 5. Click “Connect” to complete the setting.
Set up shipping
For shop owners and customers, every shipping problem has a solution. After all, the responsibility of business owners is not only limited to purchasing and selling products, but also to ensure that these products can be delivered to customers. Setting up shipping can be a complicated process that requires consideration of product weight, packaging cost, shipping destination, carrier rate and potential profit per order, and other variables.
Most major courier companies provide online shipping calculators. You need to roughly understand how much your business will cost to transport internationally or domestically.
Nihaojewelry provides different solutions for wholesale customers and dropshipping customers.
You can implement your shipping strategy under the “Shipping setting”.
For Dropshipping customers, select “Ship to your custom (Dropshipping)” and click “Confirm” to directly synchronize the shipping options of Nihaojewelry to your store.
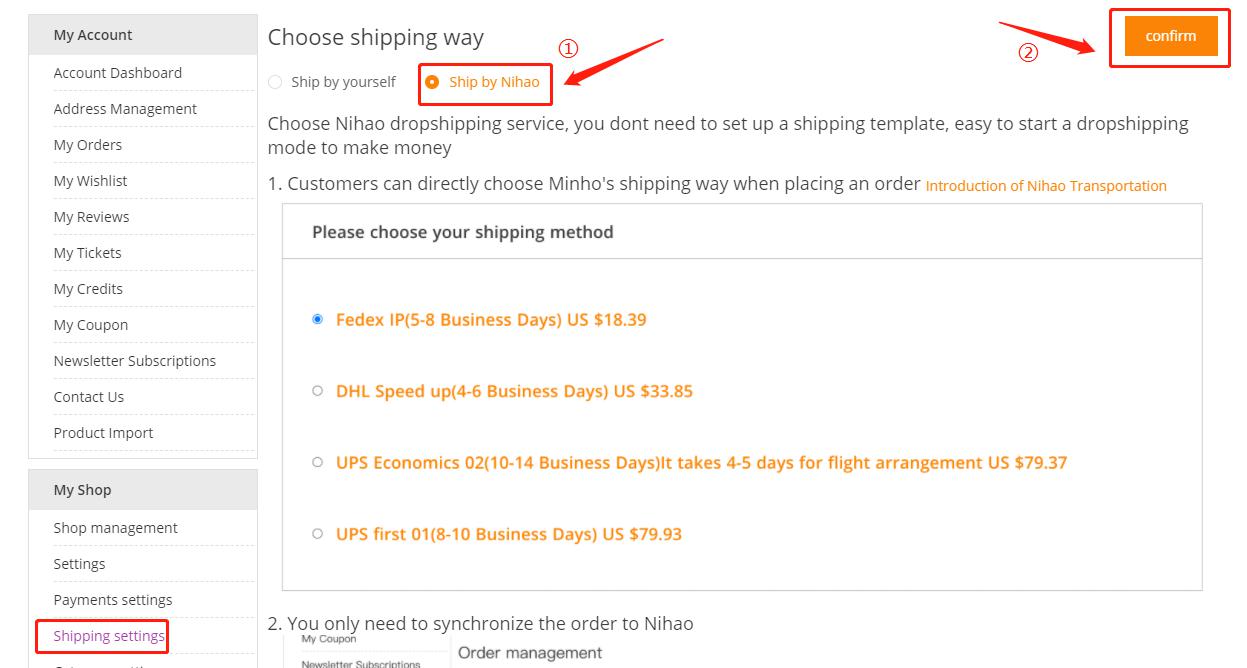
While wholesale customers need to choose “Ship to yourself” and create your own shipping according to actual needs:

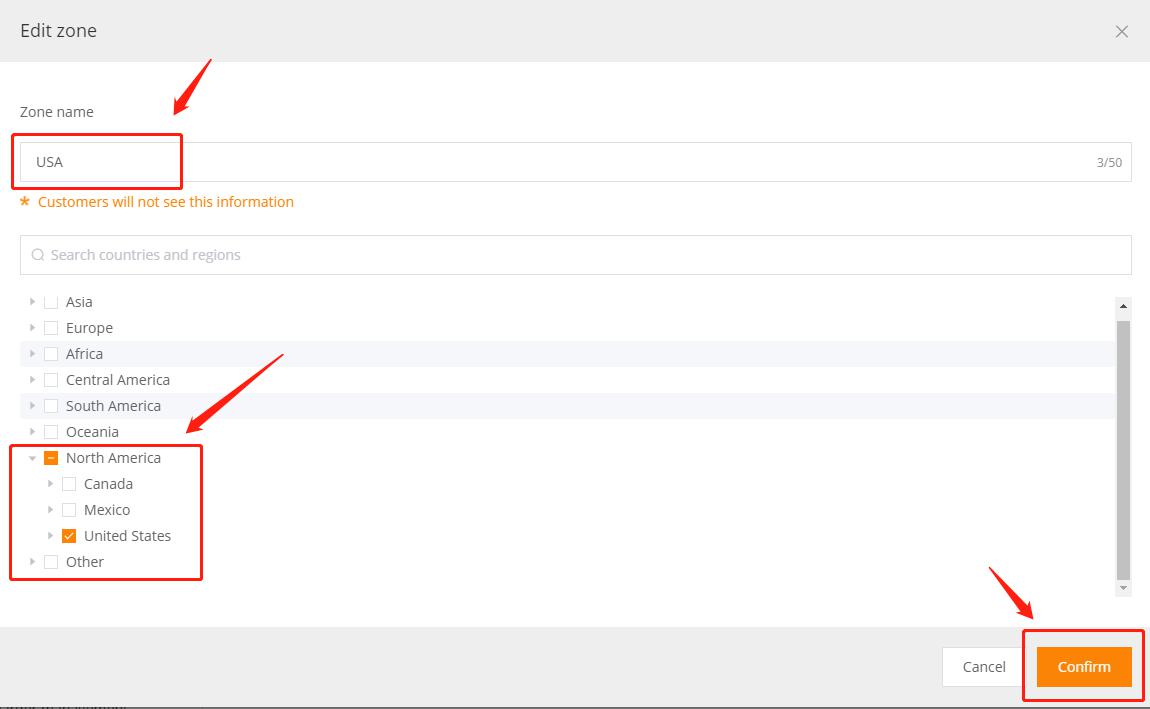
1. Set up shipping zone
You need to create a shipping zone first. Here you can set the shipping rate to customers in certain countries.
- Click “Create shipping zone”

- Fill in the “zone name”, and select the countries and regions where delivery is allowed. (The zone name is only used by the store owner to facilitate management, and will not be displayed on the consumer’s order page.)
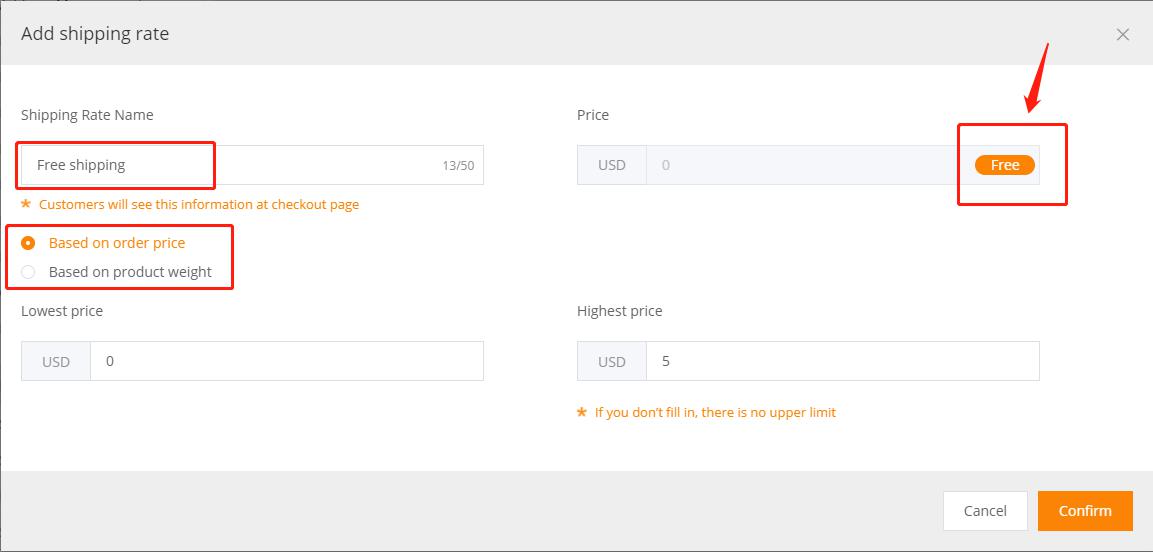
2. Set the rate for the area
Shipping Rate Name: The name of the shipping rate is visible on the customer order page. We recommend that you fill in the logistics name and delivery time here, such as ship by DHL (2-3 business days).
Price: The set rate. By default, it is 0 USD (the “Free” button is orange). If you need to modify the amount, you need to click the “Free” button to make it gray, and then fill in the amount.
Based on order price/Based on product weight: You can set the rate based on the order amount or price. Create a new shipping profile to set the tiered price for this area. For example, you can provide free shipping based on the condition that the order reaches a certain threshold. Or, if the order exceeds a certain weight, you can set a higher rate. The rate of each zone can only be set in the same way.
- If you need to set different rates for other areas, you need to create a new shipping zone.
Publish your store
When you set all this up, your online store has been published in real time. Consumers can start buying in your store now. Just in case, you can place a test order in your store to correct errors in time and provide a smooth user experience.
Store analysis
After the store is released, marketing is a necessary step to obtain traffic orders. You can find some marketing tips to promote your business in our blog, such as TikTok Marketing for Beginners, What are the Best Ways to Promote a YouTube Channel?.
Where can I check store traffic and order status?
“Shop management”.
Here you can view total sales, total orders, total visitors, today’s sales, number of new orders, and new customers. Through these data, you will figure out where your traffic and sales come from, and your overall online store conversion rate.

For more detailed analysis and flexible reports, you can set up Google Analytics for your store for free. It allows you to measure your advertising return on investment and track Flash, video, and social networking sites and applications.
Order management
When you get the first sale, you need to manage the order.
Go to “Order management” and you will see the orders placed by customers from your shop.
If you are starting the dropshipping business, select the order that the customer has paid, and synchronize it to Nihaojewelry. Nihao will generate a Nihaojewelry order for you and ship it directly to your customer after you have successfully paid. The tracking number will be provided by Nihaojewelry and synchronized to you for easy management.
If you are doing a wholesale business, the operation is slightly different.
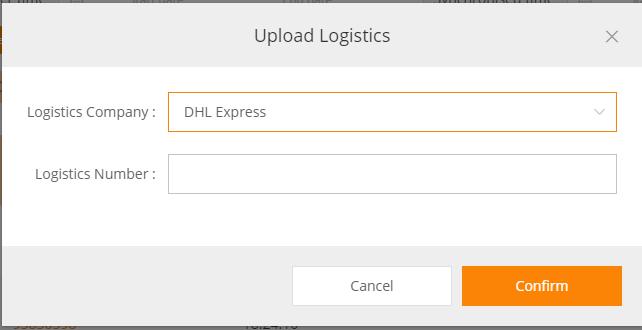
When your customer orders, if you have stock, you can ship them directly to the customer, and upload the tracking number.
If you do not have inventory and need to place an order from Nihaojewelry, you need to synchronize the customer’s order to your shopping cart on Nihaojewelry and then place an order.
How to synchronize?
1. Select the order that needs to be synchronized
2. Click “Post to Nihaojewelry”
At this time, the order has been successfully added to your shopping cart in Nihaojewelry. Select the product you need to check out.
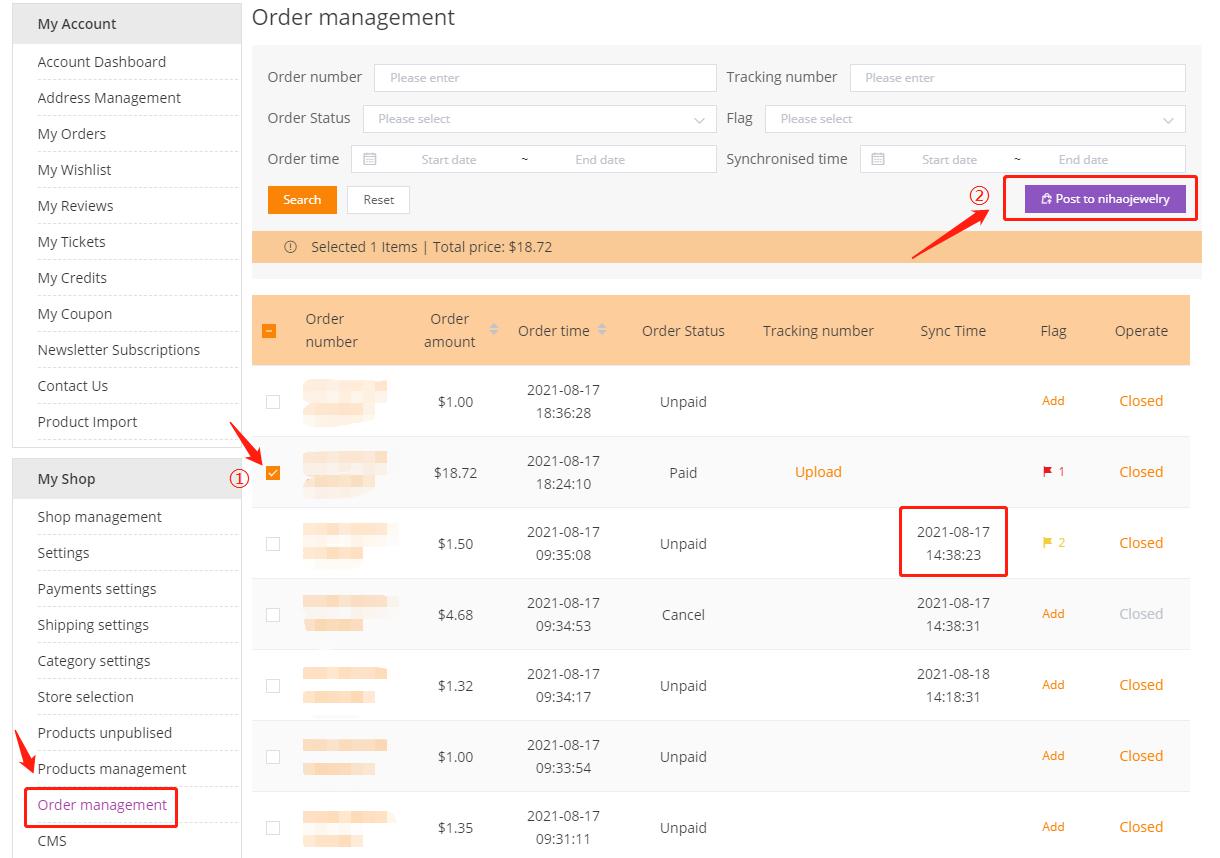
You can also find the following information on the order management page:
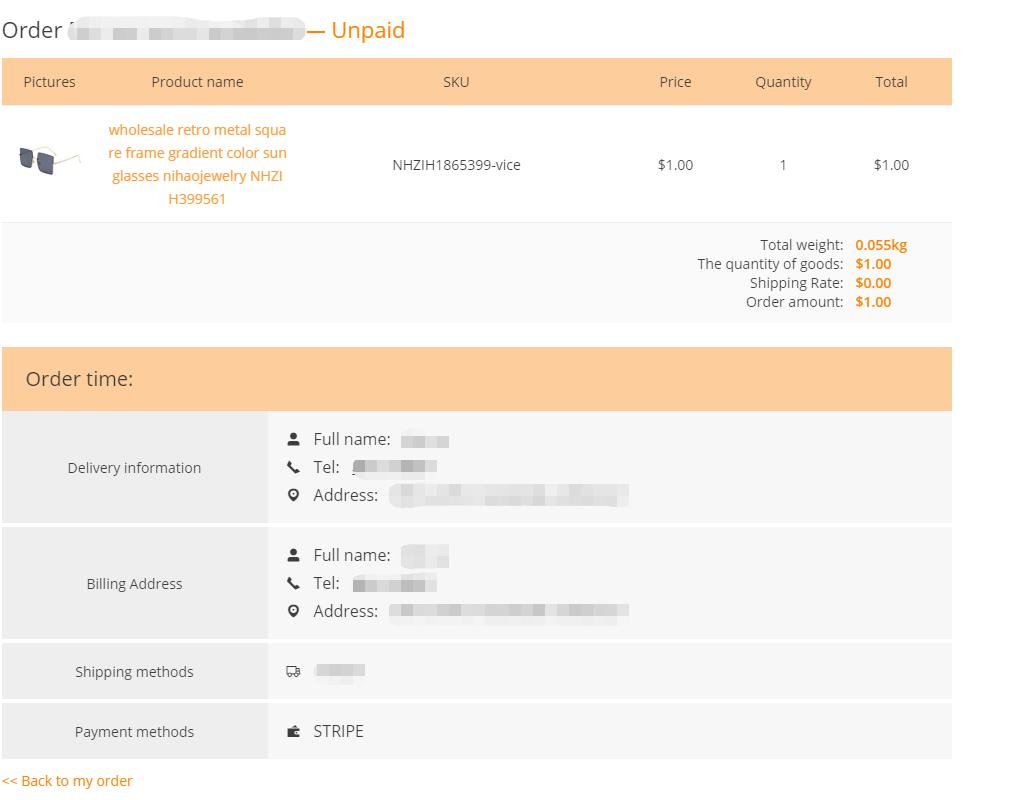
Order number: After the customer places an order from your store, an order number will be automatically generated. Click the order number to view the detailed information of the order, including the status of the order, the product ordered by the customer, shipping information, billing address, the shipping method, and the payment selected method by the customer.
Order amount: The order amount of each order.
Order time: The time when the customer placed the order.
Order status: Three possible order statuses, including paid, unpaid, and cancelled.
Tracking number: When you send the order to the customer, the logistics company or courier company will give you the tracking number. You need to upload the corresponding information (logistics company and logistics number) by yourself.
Sync time: The time that you synchronize customer orders to Nihaojewelry’s shopping cart.
Flag: Used to mark different orders.
Operate: If you need to close an order, select “Cancel” in the corresponding order.
Above we have introduced all the steps from applying for an online store with Nihaojewelry to processing your order. The whole demo ends here. You will find that actually starting a shop online is not as difficult as you might imagine. We welcome all interested users to open shops with Nihaojewelry, and provide more valuable opinions for us!

")


10 Comments
Patrinya Jordan
Hello I am trying to set up a store with you guys however I do not have a 60x60ICO favicon and I have been searching the internet I need that to set up the store. Because it won’t let me move to the next step without it. Do you have one I can utilize?
jessica
Hi, you can open a store without a favicon, because we have a default favicon.
If you do want a favicon, here are some icon converter online websites for you:
https://convertico.com/
https://cloudconvert.com/jpg-to-ico
https://image.online-convert.com/convert-to-ico
Samantha C Blount
Hello,
I would like to create an online shop. Can I use my own website template?
jessica
Hi Samantha, If you use Nihao Jewelry’s free website builder, you are currently not able to use your own website templates. You can only use the three templates we provide, because we have not opened the web source code so far.
Hanane
Bonjour, il n’y a pas d’informations sur l’étiquetage des produits envoyés à nos clients. Vous personnalisez avec notre marque ou vous envoyez votre logo ?
Cordialement,
Hanane
jessica
Bonjour, nous pouvons fournir des services de branding personnalisés si vous en avez besoin. Cependant, cela est disponible moyennant des frais supplémentaires. Mon collègue vous enverra un e-mail avec des informations spécifiques. Ou vous pouvez demander à notre service client.
Jessica
Tony
Are Stripe and PayPal the only payment methods that you offer ?
jessica
Yes, for this program.
Tony
I want to create an online shop but I keep getting an error message each time and it won’t let me create one ?
jessica
Hi, sorry that we have now suspended this project, if you want to do dropshipping, please use Shopify or WooCommerce to build e-commerce website. We have free plugins available for you to import products.
For details, read this article: https://blog.nihaodropshipping.com/use-nihao-dropshipping-app-for-dropshipping/