The era of the digital marketplace has brought great convenience to people. Surveys show that more and more online shoppers Start Social Shopping.
Instagram, TikTok, and Facebook shopping are making waves in the social shopping space.
Their biggest advantage is that the followers are the product audience and the conversion rate is high.
Imagine a mall with over 2 billion visitors eager to learn about new trends and immediately share what they find with all their friends.

In this guide, we’ll show you how to sell products on social shopping (Instagram, TikTok, and Facebook) so you can keep up with the latest business models.
What is Instagram shopping?
Instagram has become an indispensable platform with over 1 billion monthly active users.
Instagram Shopping is a built-in feature of the ins app that allows users to easily learn about your products and purchase them directly in your posts, stories, reels, and live streams.
According to Instagram, 87% of users say influencers have inspired them to buy products and 70% of avid shoppers turn to the platform to discover new products.
The exciting news is that setting up an Instagram store and selling online through Instagram is very simple.
You can utilize Instagram’s shopping features to showcase your products, mark up prices, and seamlessly direct customers to your website.
With a carefully crafted sales strategy, you can effectively convert your followers into customers and sell on Instagram. Just like the famous jewelry store Tiffany.
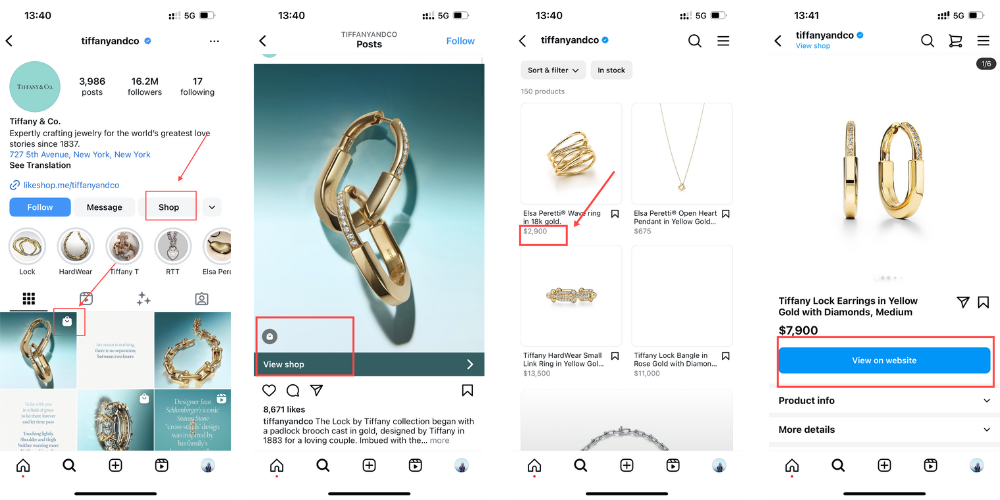
How to sell products on Instagram?
To set up Instagram Shopping, you need to have a business profile and link it to a Facebook page so you can build a product catalog.
Before setting up Instagram Shopping, you must ensure your business meets these 5 requirements.
- Your business is located in a supported market where Instagram Shopping is available. Check here to confirm.
- You sell physical, eligible products.
- Your business complies with Instagram’s Merchant Agreement and Commerce Policies.
- Your business owns your eCommerce website.
- You have a business profile on Instagram.
The specific steps are as follows:
Step 1: Set up an Instagram Business Account
Check if your Instagram account is a business account. This is a prerequisite for selling on Instagram.
INS business account gives you access to a variety of analytics in addition to making you eligible to use the Instagram shopping feature…
- First, click “Settings and Privacy”. Then click on “Creator tools and controls”.
Note: If this button shows “business tools and controls,” then you are already using an Instagram business account.
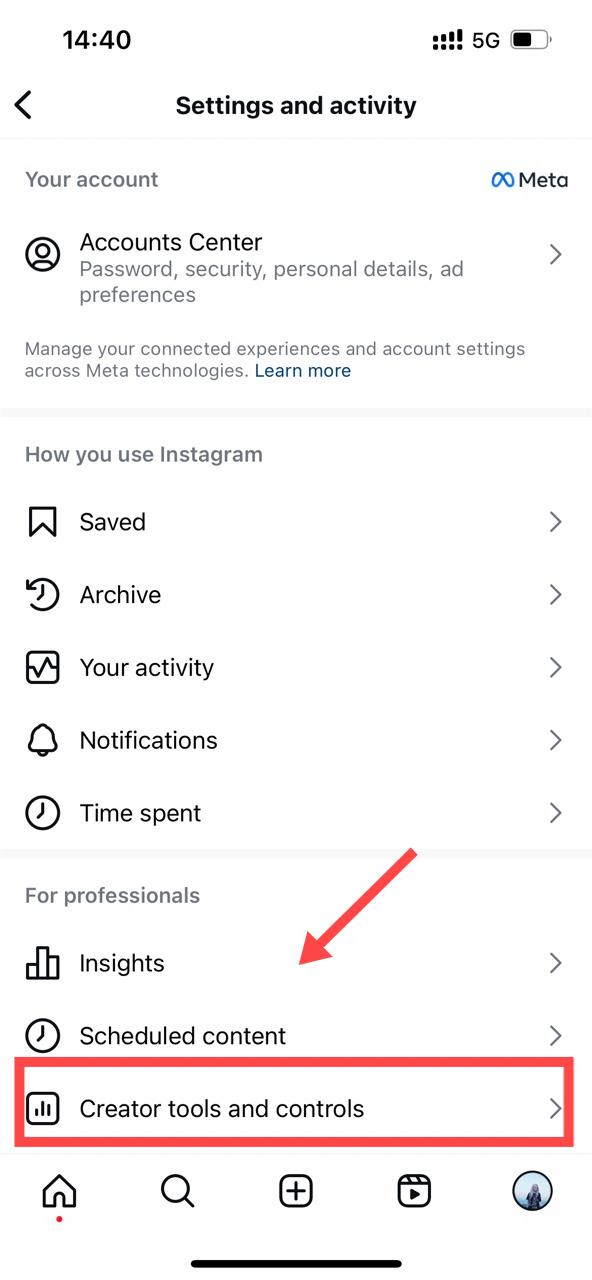
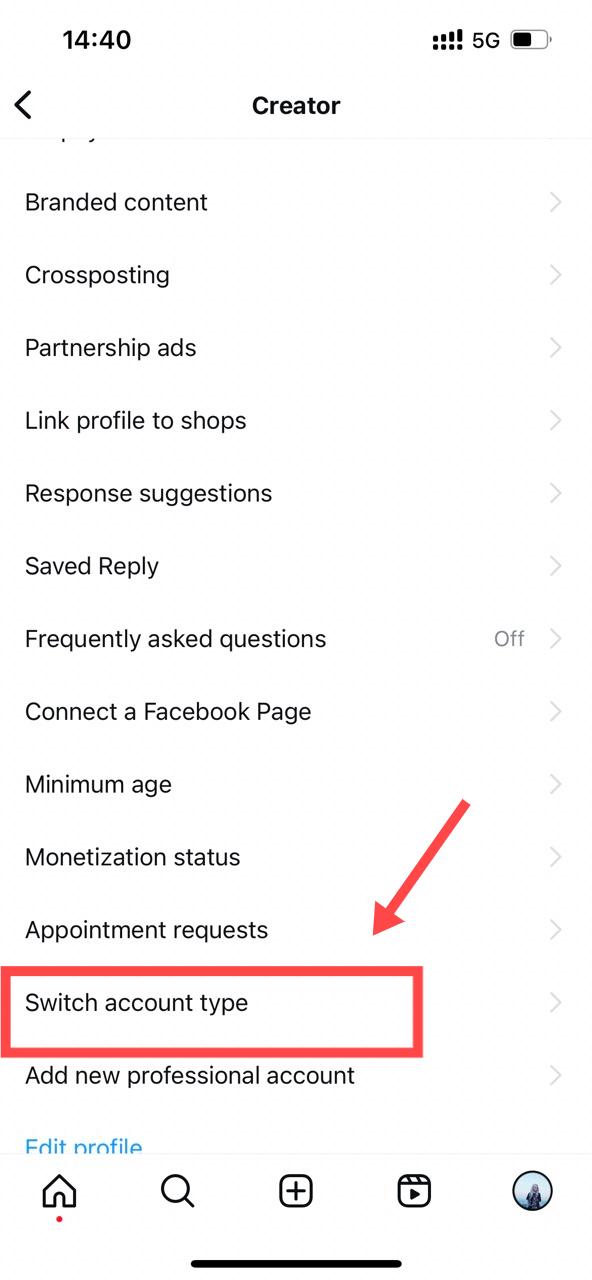
- Click “Switch Account Type”.
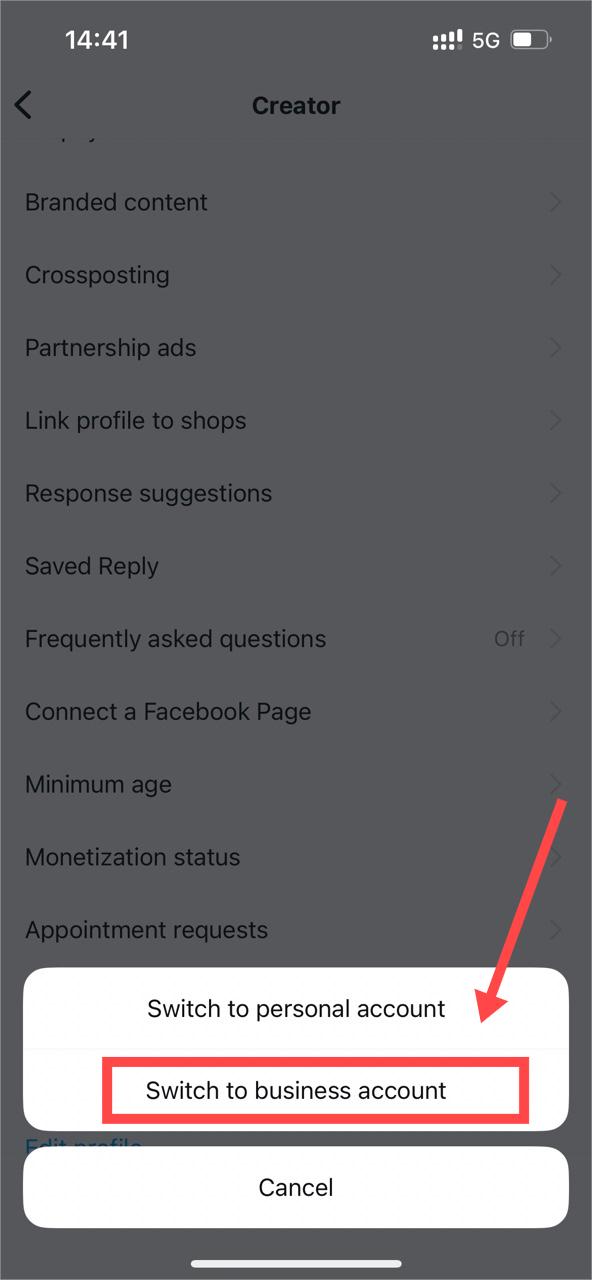
- Finally, select “Switch to business account”.
Step 2: Use Commerce Manager to set up Social Shopping
To launch your Instagram store, head over to Commerce Manager by Meta.
It’s a desktop-friendly tool for managing Instagram and Facebook shopping and the easiest way to get started.
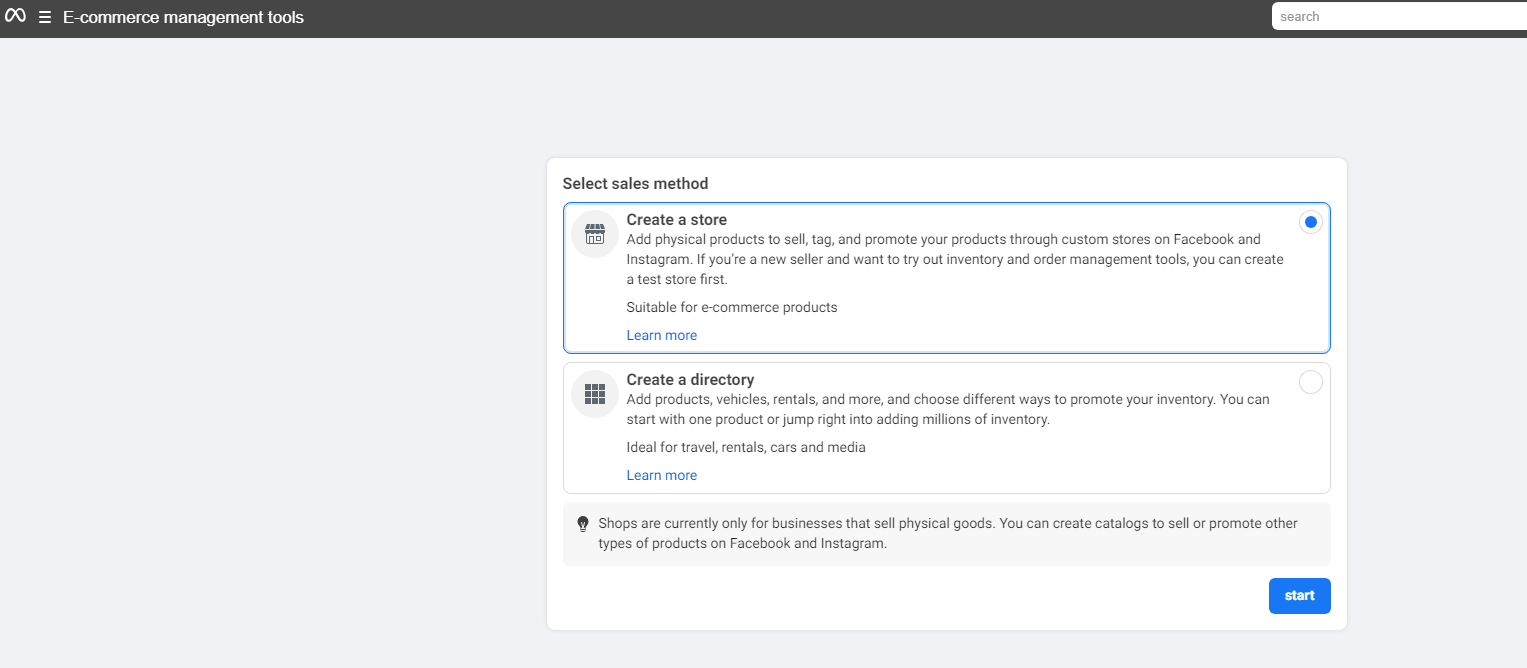
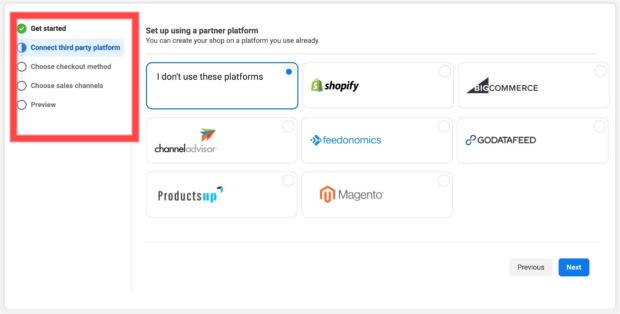
First, enter some general information, then follow the steps to refine it.
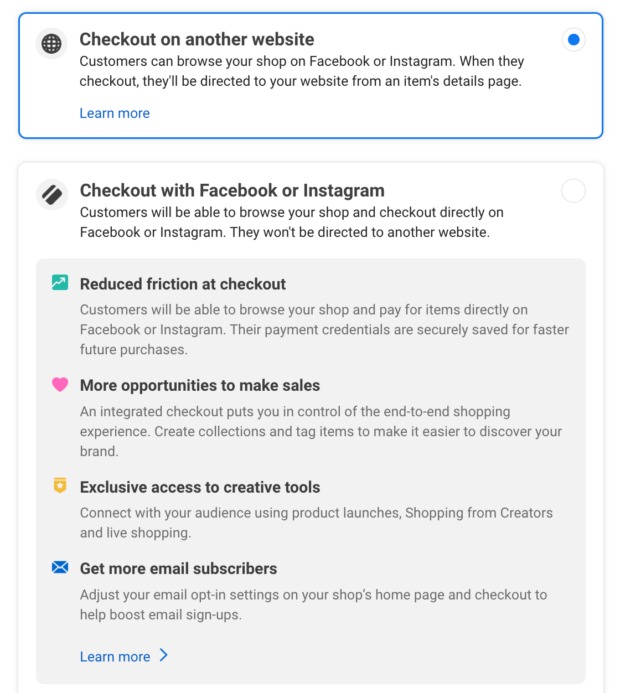
For one of the checkout methods, please choose how you want your customers to complete their purchase.
Note, however, that choosing ”checkout on another website” means that customers will be able to browse your products on Instagram or Facebook, but when it comes to actually paying for them, they will be directed to another website to complete the transaction.
So we recommend that eligible U.S. businesses choose to checkout directly through Instagram or Facebook.
This way your customers will have one less step to convert when making a purchase.
Step 3: Connect To a Facebook Page
Link your business Instagram profile to the Facebook business profile you set up.
If you have an Instagram account linked to your business Facebook page, when you open your Facebook store, you’ll get a link to open your Instagram store.
Step 4: Upload your product catalog
Go ahead and use Commerce Manager to add products to the catalog.
You can do this manually, by using a spreadsheet full of data or through Meta Pixel.
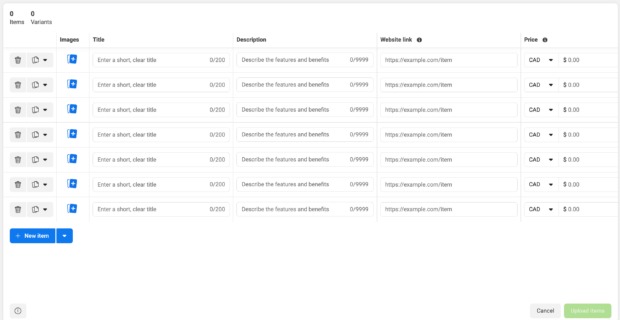
To add a product, simply fill in each field shown on the Commerce Manager’s product catalog page.
Of course, there is an even easier and faster way – to integrate a pre-existing product database from a certified eCommerce platform (like Shopify or BigCommerce).
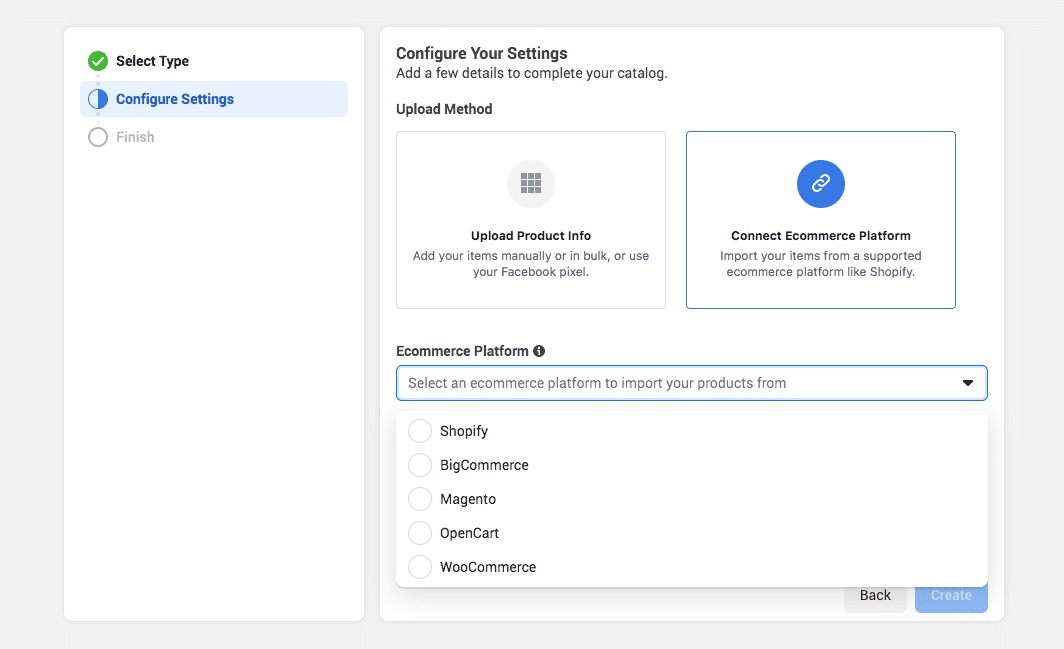
Once you’re finished entering this information, click “Upload items.” Bam—you’re open for business.
Step 5: Submit your account for review
Finally, you’ll need to submit your account for review. These reviews usually take a couple of days, but sometimes it might run longer.
Once approved, you will be able to tag your products in posts and stories. So that your followers can buy directly from Instagram.
Learn more with the video.
What is a Tiktok shop?
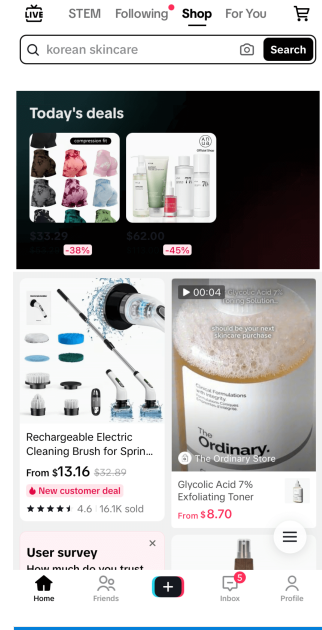
TikTok Shop is a shopping feature accessible directly on the TikTok app.
It allows merchants, brands, and creators to display and sell products directly on TikTok through in-feed videos, TikTok Lives, your own Shop page, and the platform’s Shop tab.
In the U.S. alone, there are approximately 143 million active users on the social networking site.
According to surveys, 37% of TikTok users buy products immediately after discovering them. Their conversion rate is 1.5 times higher than users on other platforms.
Additionally, 1 in 4 TikTok users want to buy a product via TikTok Live because they can see a full demonstration of the product, not just a picture.
How to sell products on Tiktok?
To start selling on TT Shop, you need to have an account with the platform.
Sign up as a TikTok Shop seller today and embrace faster and greater business growth.
Step 1: Set up a TikTok Shop account
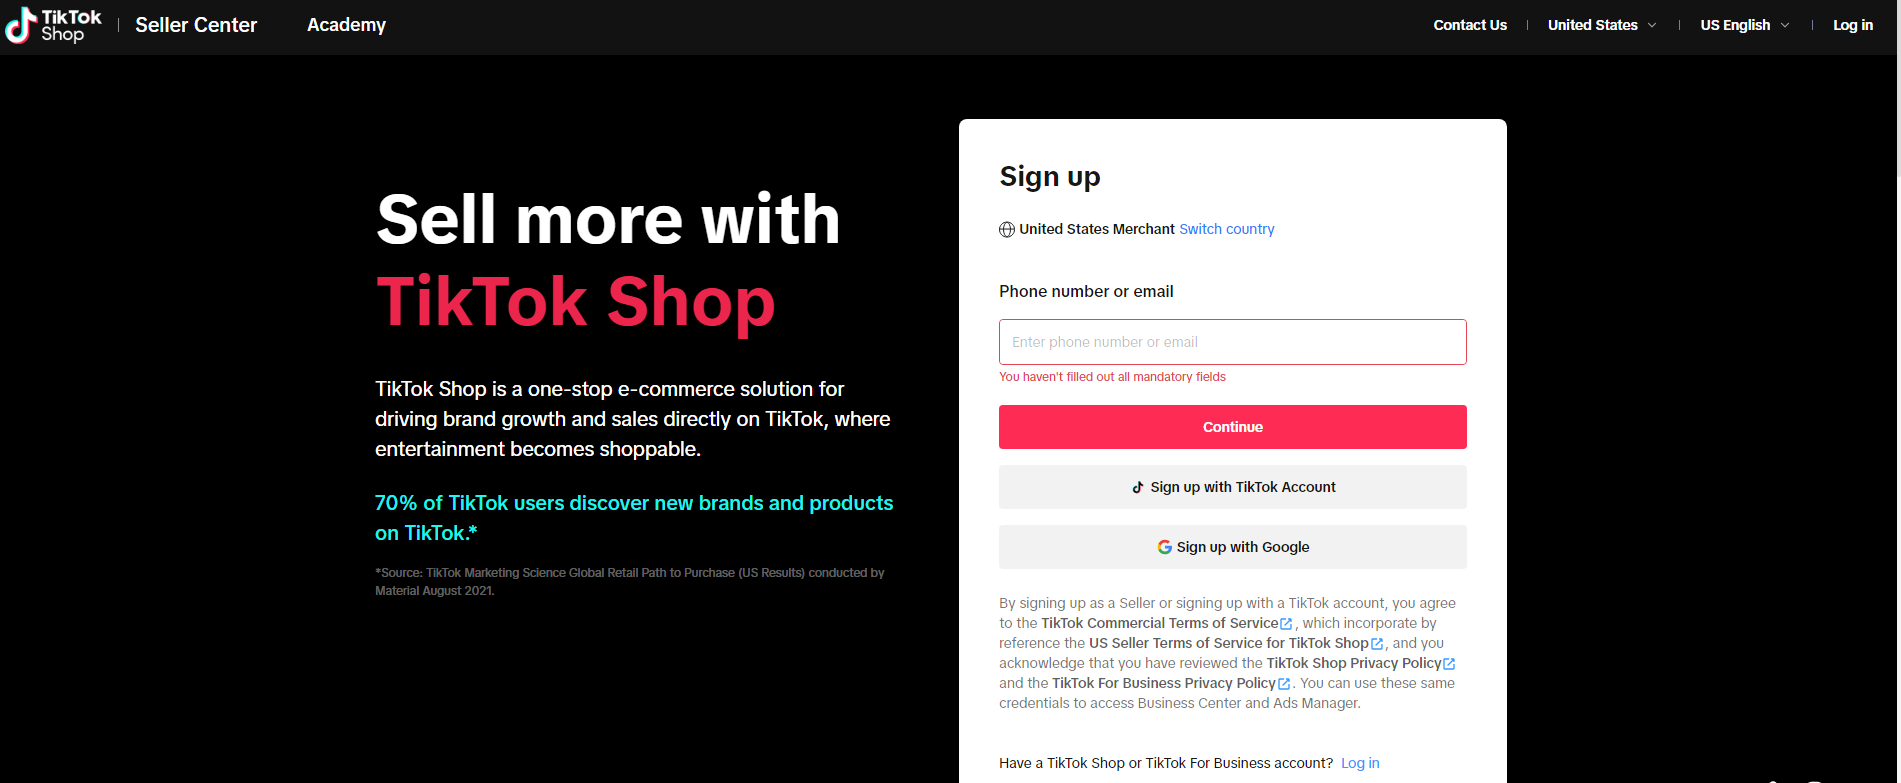
Register as a merchant by visiting the TikTok Seller Center and selecting your region.
You can register using your phone number or email, or if you already have a TikTok account, you can sign in to that account.
Step 2: Complete account information and the verification process
Here, you wanna add basic information about your business so you can be verified.
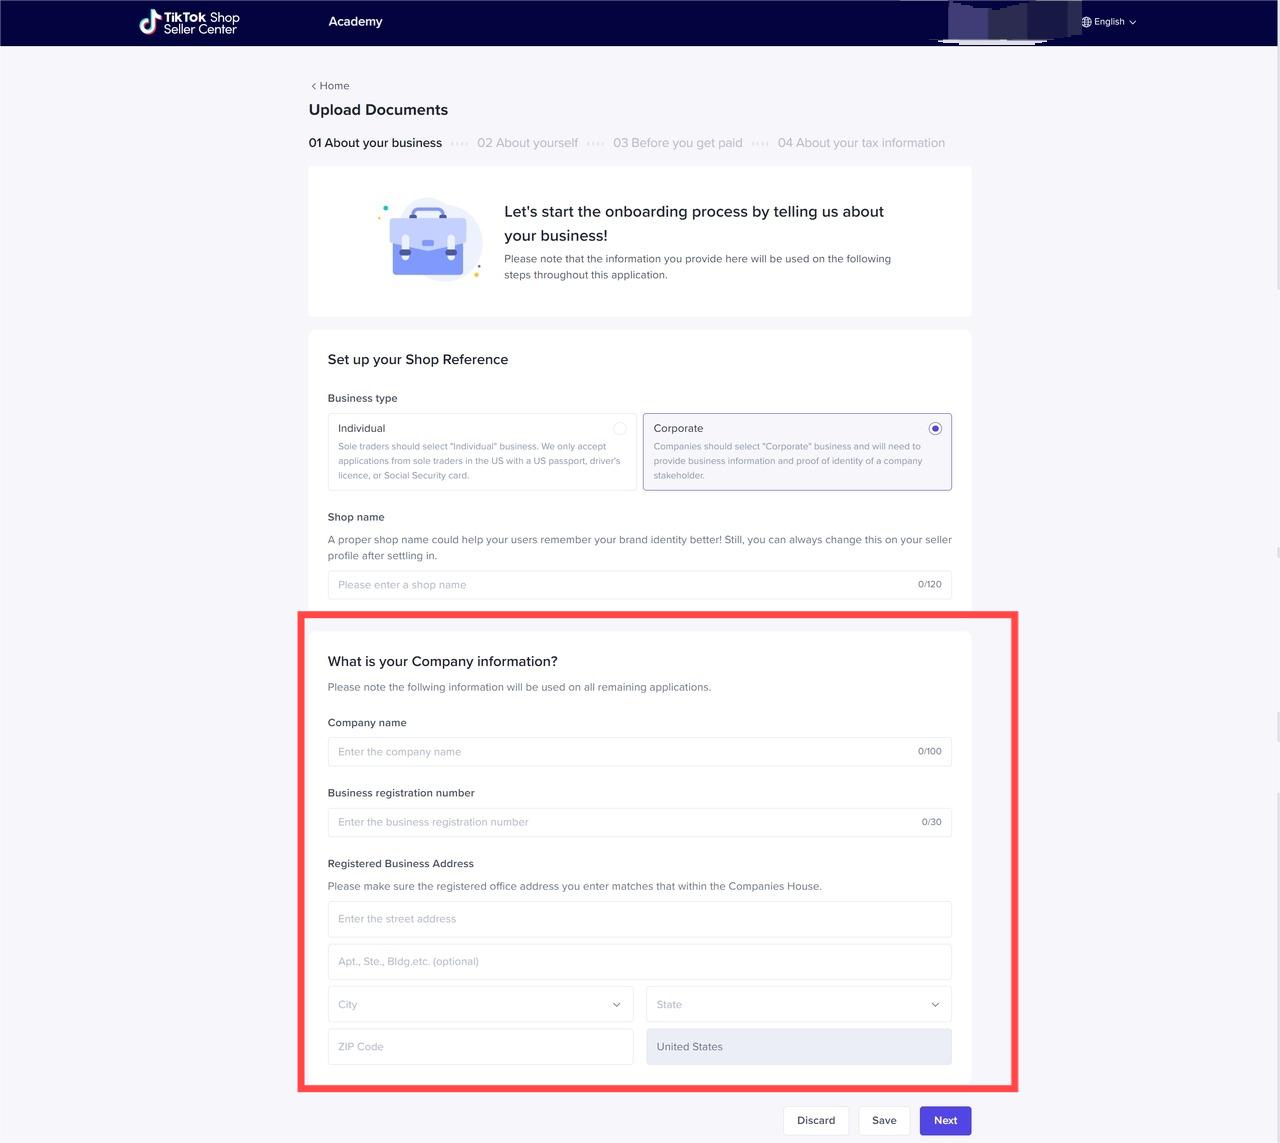
If you’re an individually owned business, you’ll upload an image of your passport, national ID, or driver’s license.
If you are a corporation opening a Shop, you must upload a government-issued identification document and a business license, registration, or similar document to confirm your business eligibility.
It’s important to note that you can only open one TikTok Shop per identity.
After adding the necessary information, it’ll take about 24 hours for your account to be verified.
When it is, you’ll be taken to your dashboard, which looks pretty much like this:
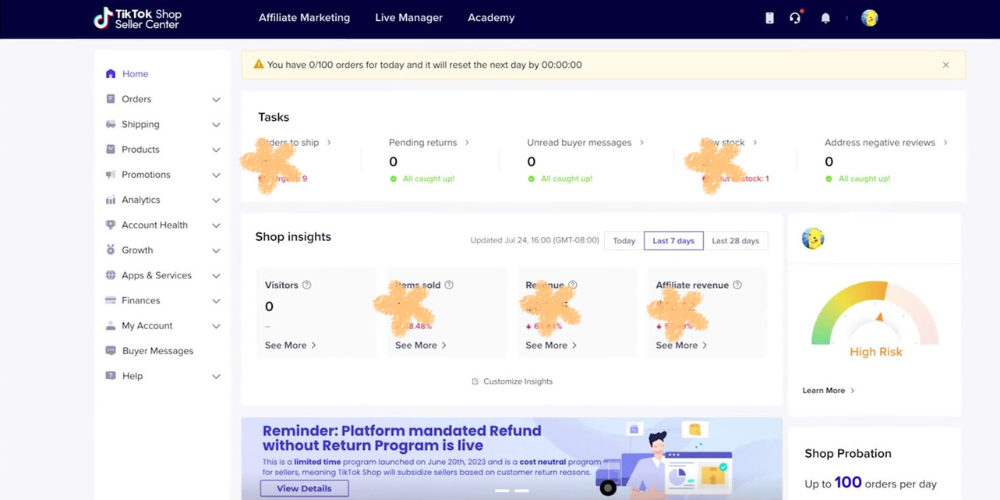
You’ll be able to manage your store, inventory, orders, promotions, creator partnerships, customer service, and more in the Seller Center.
Step 3: Add your products to your TikTok Shop
Next, you can continue to add new products to your TikTok store in the Seller Center.
Again, after clicking the Add Product start button, you have two options:
- Manually upload a product by downloading a template and uploading a spreadsheet
You will enter details such as product name, product description, price, quantity in stock, product images, and more.
- Import the product from e-commerce platforms such as BigCommerce, Shopify, Square, or Amazon through an integration tool.
After adding a product, you can return to the TT Shop dashboard to confirm it.
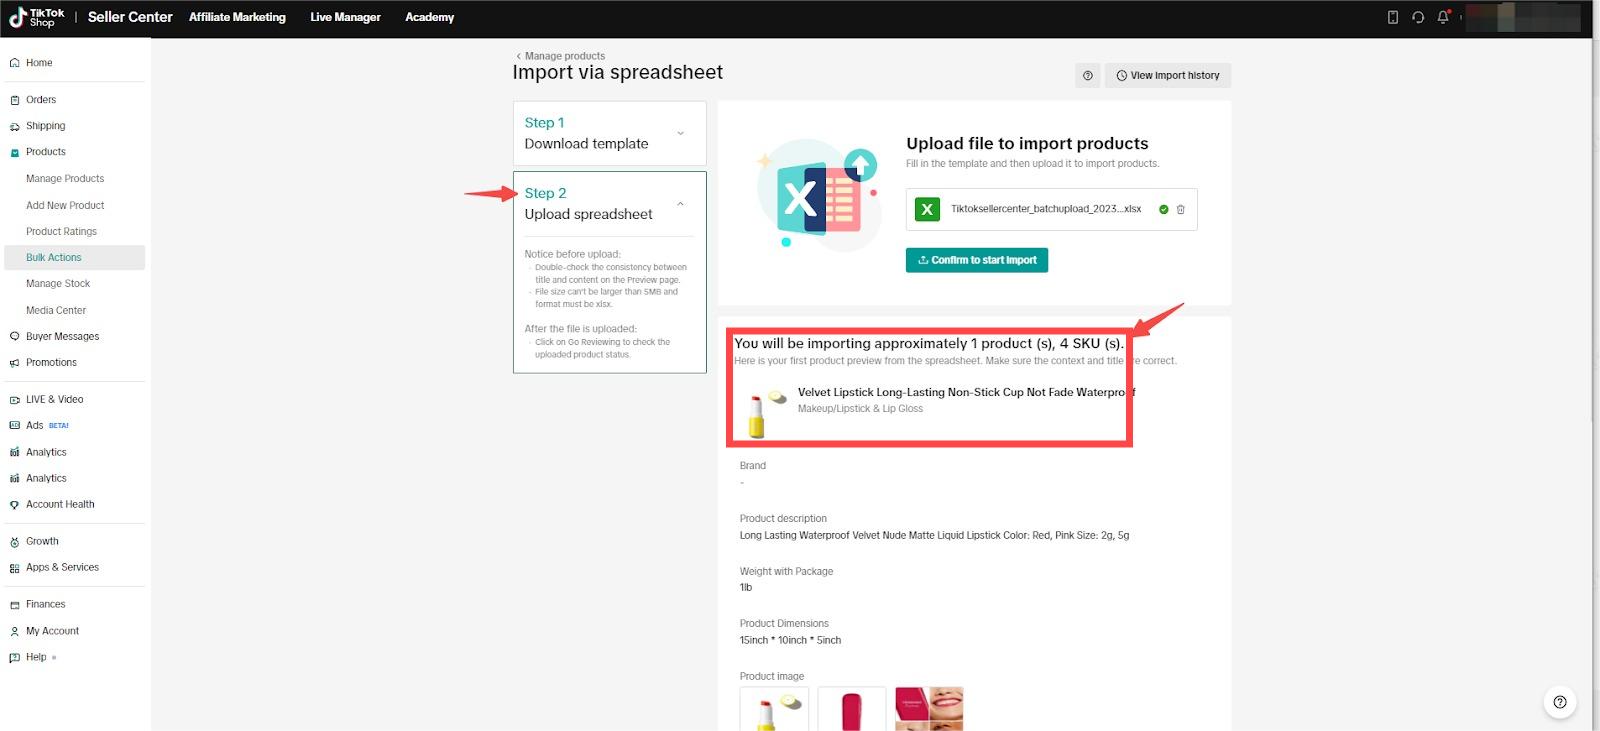
But be aware that it takes the TT team around 24 hours to review and approve your submission, so until they do, you’ll see it marked as ‘pending.’
Step 4: Create engaging content with product links
Now that your account is set up, you can start creating relevant content!
When creating content, from the Post menu, select Add Link and click Products, select the product you want to promote and click Add.
Enter the product name and click Add to continue. When finished, view and publish your content.
After publishing, the product link will only be added to the published content once it has been approved.
Users will then have direct access to the shopping features on your content.
Here are some tips for increasing sales with TikTok Shop:
- Try to create content that is fun and entertaining, but not too salty.
- Try to grab the viewer’s attention quickly within the first few seconds of the video.
- Add popular hashtags.
- The beauty of TikTok is that you can post multiple times a day to increase your chances of popping. We recommend posting at least 1-3 per day.
- Create a challenging and unique hashtag for your product to encourage engagement.
- Actively engage with your audience as you start to get views, likes, and comments.
- You can promote your brand on TikTok by partnering with an “internet celebrity” or creator with a large following.
Why choose Facebook to sell?
Facebook itself has a whopping 2.9 billion monthly active users, and few platforms can match Facebook.
The great thing about Facebook is that it is used by a wide variety of audiences with different interests and demographics.
No matter what your market segment is, there’s a good chance you’ll find your target audience on Facebook.
There’s no doubt that having a business account on Facebook is good for all brands, as it helps to strengthen your brand and increase product sales!

How to sell products on Facebook?
Facebook offers tons of tools to help businesses and users sell online.
Facebook’s business tools make it easy to start and grow a business on its platform.
If you already sell products online through an e-commerce store, it’s smart to embrace social commerce by selling on Facebook.
Facebook shops
Facebook shops are a place for businesses to showcase and sell their products for free.
With Facebook Shops, businesses can set up a fully functional online store directly on their Facebook business page. Your customers can purchase items without ever leaving Facebook.
The beauty of Facebook Shops is that the feature can be found naturally or through ads, which means social media marketers have plenty of opportunities to optimize both channels for their business.
If you’re a small business owner looking to build an audience, grow your brand, and increase sales all at the same time, then Facebook Shops is the best sales channel to use.
How to sell on Facebook Shops
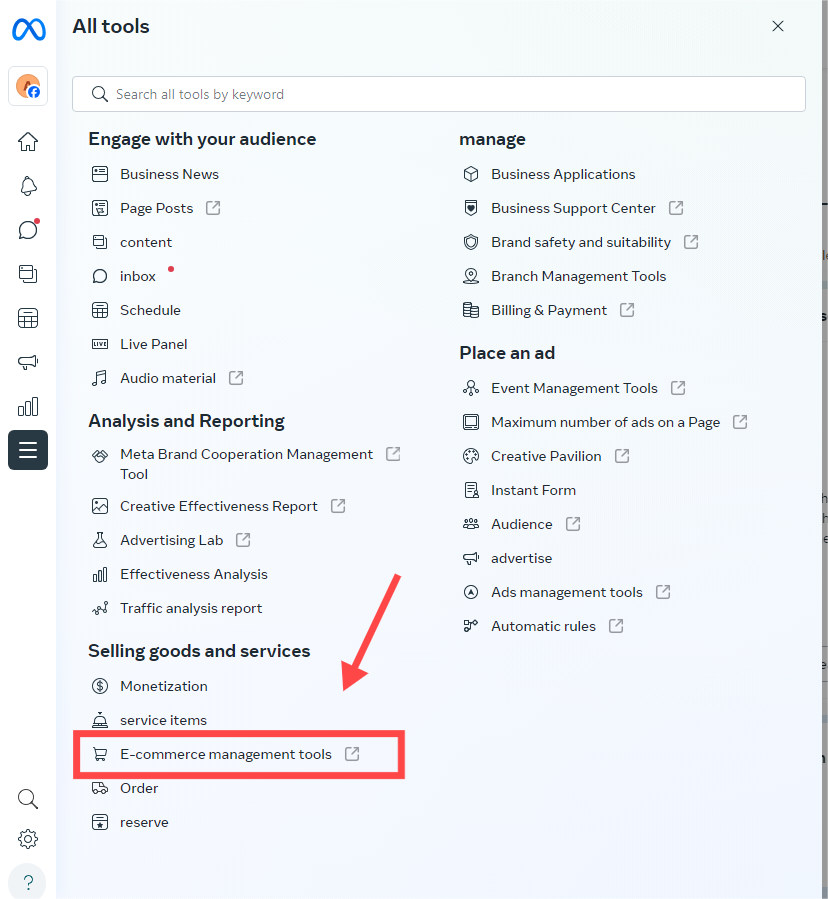
- Create or log in to a Facebook Business Page. Click on “Meta Business Suite” on the left.
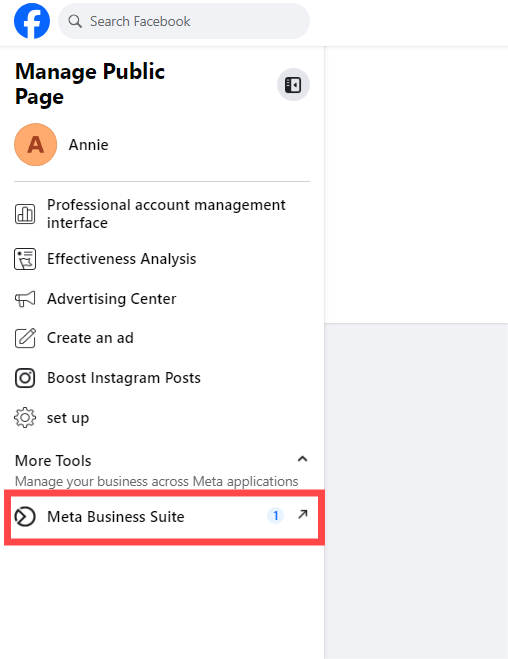
Then select ”E-commerce management tools” in ”All tools”, and open Facebook Commerce Manager.
Same as step 2 of Instagram shopping creation, create your store and complete the information, upload products. Finally, submit your store and complete the setup.
In Facebook Shops, you can send messages to businesses via WhatsApp, Messenger, or Instagram Direct to ask questions, get support, track deliveries, and more.
Finally, Facebook Shops is very easy to set up and manage!
Businesses can use many third-party platforms (including Shopify, BigCommerce, and Woo) to manage their stores, social ads, and more.
Facebook Marketplace
Facebook Marketplace has become more popular than Amazon and eBay – online stores can now use the marketplace as a sales channel.
Facebook Marketplace is a safer and more user-friendly platform for selling locally.
All you need to start selling on Facebook Marketplace is an active Facebook account.
How to Sell on Facebook Marketplace
If you already have an active Facebook account, simply log into Facebook, click the Marketplace button on the left menu, and then click Create New Listing.
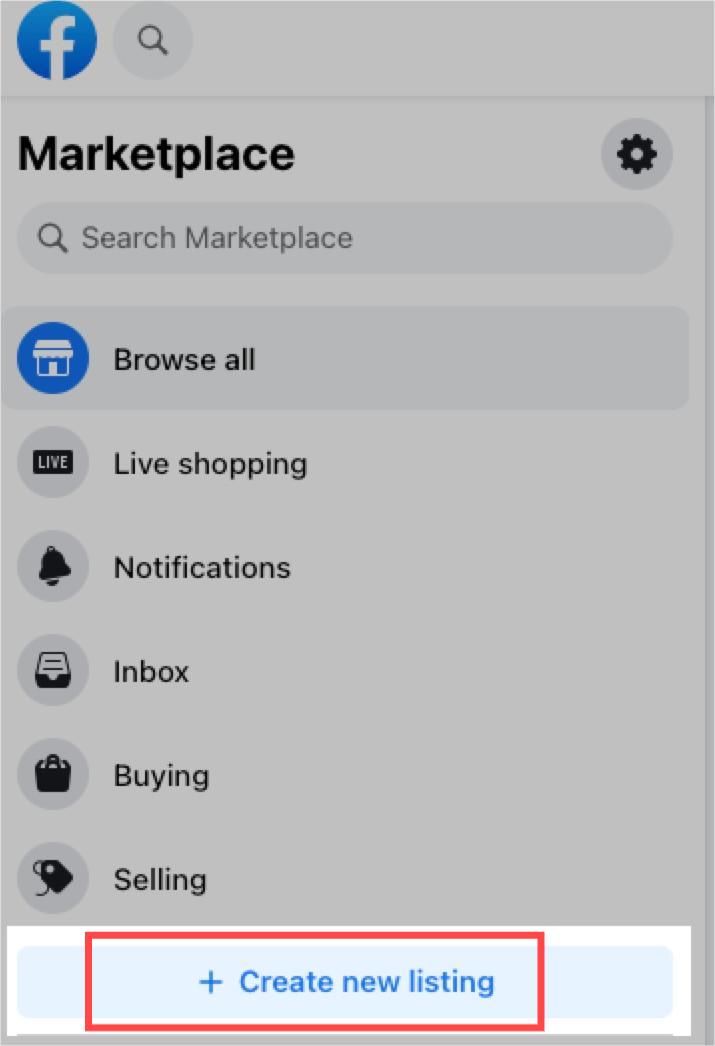
You can sell almost anything on Facebook Marketplace.
Before you start selling on Facebook Marketplace, you should do some product research to ensure that what you are selling is profitable.
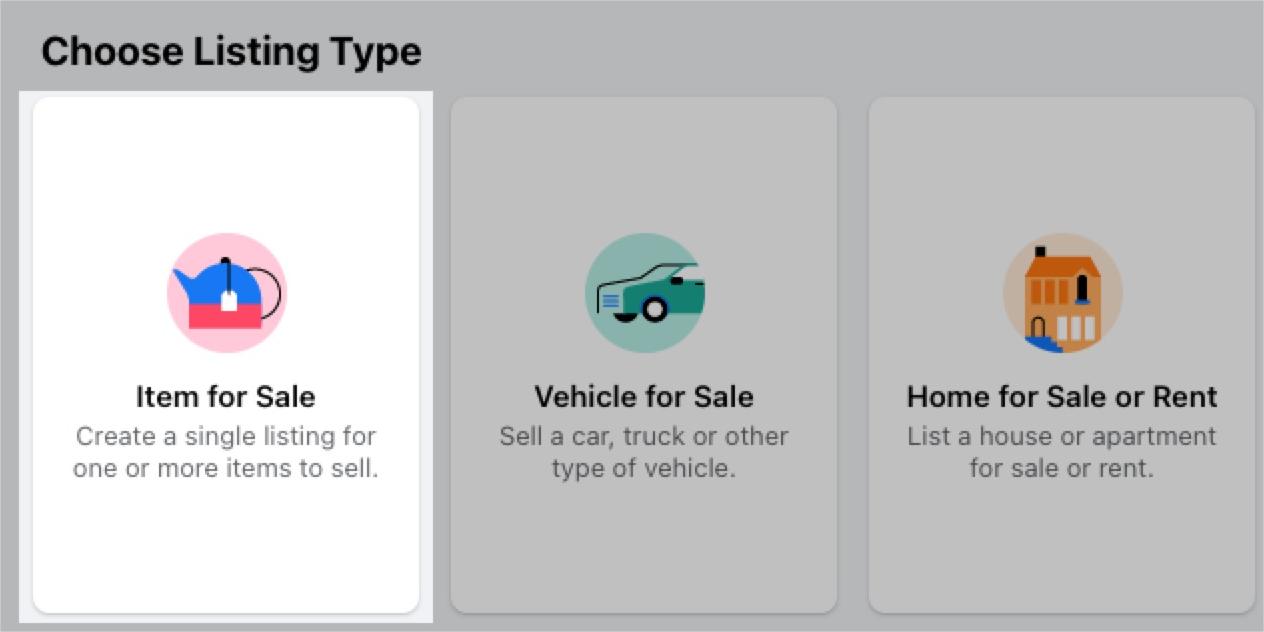
Once you have selected the product you want to sell, add high-quality photos of the product, an engaging product description, price, and other details.
After adding all the product information, click Next. You will see a preview of the Marketplace listing.
Finally, click Publish and start selling on Facebook Marketplace.
In the meantime, you can boost their views by creating Facebook ads for your Marketplace listings or posting your listings in local groups.
Facebook buy-and-sell groups
Any administrator of a Facebook group can enable selling and buying.
However, most of the groups with the sell feature enabled are local networks, because sales are usually arranged privately between buyers and sellers.
While buy-and-sell groups are primarily used by occasional sellers, they do offer opportunities for small businesses looking to build a local audience.
You can’t integrate checkout functionality into a group page, but businesses can direct interested buyers to their Facebook store or website to make a purchase.
How to sell through Facebook buy and sell groups
- Join the group you want to sell to.
- Click Sell Something at the top of the buy and sell group page.
- Select Item for Sale from the options given.
- On the next page, you’ll be able to enter all of your product information, including an image, description, and the location you want to sell in. Enter the required info and click Next.
- After you enter the product information, if you choose to add the product to Marketplace, the product will appear in the feeds of users that Facebook believes are most interested in your product.
- Once you’ve selected the groups you want to post in, click Post.
In Conclusion
As competition intensifies and omnichannel strategies come into play, merchants are looking for new ways to diversify their sales channels, including leveraging existing social shopping and online platforms.
Social shopping is expected to be one of the most important sales channels for e-commerce businesses.
In a few years, we’ll have more online shopping experiences that may all begin and end on social media!
But until then, we hope that this social shopping guide on how to sell your products on Instagram/TikTok/Facebook will help you choose the channels and tools that work best for your business.


